# 十七、Mybatis简介
# 原始jdbc操作
// 注册驱动
Class.forname("com.mysql.jdbc.Driver");
// 获取连接
        Connection conn = DriverManager.getConnection("jdbc:mysql:///test", "root", "123456");
// 获得Statement
        PreparedStatement ps = conn.prepareStatement("select id, name, password from user");
// 执行查询
        ResultSet rs = ps.executeQuery();
// 遍历结果集
        while (rs.next()) {
        // 封装实体
        User user = new User();
        user.setId(rs.getInt("id"));
        user.setUsername(rs.getString("name"));
        user.setPassword(rs.getString("password"));
        // user 实体封装完毕
        System.out.println(user);
        }
// 释放资源
        rs.close();
        ps.close();
        conn.close();
2
3
4
5
6
7
8
9
10
11
12
13
14
15
16
17
18
19
20
21
22
原始的jdbc查询操作中,一共是上述的几个步骤。如果是插入操作,则使用的是占位符,需要设置占位符操作。
上述的jdbc代码都是一些模板代码,重复性、耦合性比较高。
针对这种情况我们的解决方案如下:
原始jdbc开发存在的问题如下:
①数据库连接创建、释放频繁造成系统资源浪费从而影响系统性能
② sql 语句在代码中硬编码,造成代码不易维护,实际应用 sql 变化的可能较大,sql 变动需要改变 Java 代码
③查询操作时,需要手动将结果集中的数据手动封装到实体中。插入操作时,需要手动将实体的数据设置到sql语句的占位符位置
应对上述问题给出的解决方案:
①使用数据库连接池初始化连接资源
②将 sql 语句抽取到 xml 配置文件中
③使用反射、内省等底层技术,自动将实体与表进行属性与字段的自动映射
# 什么是Mybatis

①Mybatis是一个持久层框架
②Mybatis可以隐藏jdbc繁杂的API
③只需要关注sql语句,不需要关注其他繁杂的信息
④Mybatis会自动完成实体对象与表单数据的关系映射
# 十八、Mybatis的快速入门
# 开发步骤
①添加 Mybatis 的坐标
②创建 User 数据表
③创建 User 实体类
④编写映射文件 UserMapper.xml
⑤编写核心文件 SqlMapConfig.xml
⑥编写测试类并运行
# 代码实现
项目的结构如下

①添加Mybatis的坐标
在项目的pom.xml文件中添加依赖坐标,主要需要使用到以下的这些坐标
<dependencies>
    <dependency>
        <groupId>mysql</groupId>
        <artifactId>mysql-connector-java</artifactId>
        <version>8.0.23</version>
    </dependency>
    <dependency>
        <groupId>org.mybatis</groupId>
        <artifactId>mybatis</artifactId>
        <version>3.5.6</version>
    </dependency>
    <dependency>
        <groupId>junit</groupId>
        <artifactId>junit</artifactId>
        <version>4.12</version>
        <scope>test</scope>
    </dependency>
    <dependency>
        <groupId>log4j</groupId>
        <artifactId>log4j</artifactId>
        <version>1.2.17</version>
    </dependency>
</dependencies>
2
3
4
5
6
7
8
9
10
11
12
13
14
15
16
17
18
19
20
21
22
23
②创建User数据表
在MySQL中创建User数据表,主要属性有:id、username、password
③创建User实体类
在Java包下创建com.itheima.domain.User类
package com.itheima.domain;

public class User {

    private int id;
    private String username;
    private String password;

    public int getId() {
        return id;
    }

    public void setId(int id) {
        this.id = id;
    }

    public String getUsername() {
        return username;
    }

    public void setUsername(String username) {
        this.username = username;
    }

    public String getPassword() {
        return password;
    }

    public void setPassword(String password) {
        this.password = password;
    }

    @Override
    public String toString() {
        return "User{" +
                "id=" + id +
                ", username='" + username + '\'' +
                ", password='" + password + '\'' +
                '}';
    }
}
2
3
4
5
6
7
8
9
10
11
12
13
14
15
16
17
18
19
20
21
22
23
24
25
26
27
28
29
30
31
32
33
34
35
36
37
38
39
40
41
④编写映射文件UserMapper.xml
在文件路径src/main/resources/com.itheima.mapper/UserMapper.xml下,编写UserMapper.xml文件
这里需要用到Mybatis的映射文件头(最上面的两个标签内容)
<?xml version="1.0" encoding="UTF-8"?>
<!DOCTYPE mapper
        PUBLIC "-//mybatis.org//DTD Mapper 3.0//EN"
        "http://mybatis.org/dtd/mybatis-3-mapper.dtd">

<mapper namespace="userMapper">
    <select id="findAll" resultType="com.itheima.domain.User">
        select * from user
    </select>
</mapper>
2
3
4
5
6
7
8
9
10
⑤编写核心文件SqlMapConfig.xml
在src/main/resources/com.itheima.mapper/SqlMapConfig.xml下,编写SqlMapConfig.xml文件
在这里同样需要用到Mybatis的一个核心配置文件头(前两个标签),和前面的映射文件不一样
<?xml version="1.0" encoding="UTF-8"?>
<!DOCTYPE configuration
        PUBLIC "-//mybatis.org//DTD Config 3.0//EN"
        "http://mybatis.org/dtd/mybatis-3-config.dtd">

<configuration>
    <!--配置数据源环境-->
    <environments default="development">
        <environment id="development">
            <transactionManager type="JDBC"/>
            <dataSource type="POOLED">
                <property name="driver" value="com.mysql.jdbc.Driver"/>
                <property name="url" value="jdbc:mysql://localhost:3306/test"/>
                <property name="user" value="root"/>
                <property name="password" value="123456"/>
            </dataSource>
        </environment>
    </environments>

    <!--加载映射文件-->
    <mappers>
        <mapper resource="com.itheima.mapper/UserMapper.xml"/>
    </mappers>

</configuration>
2
3
4
5
6
7
8
9
10
11
12
13
14
15
16
17
18
19
20
21
22
23
24
25
在这里配置的是数据源环境,里面包含数据源和事务管理器,设置好参数即可
在这个核心配置文件中,我们还需要加载映射文件,根据核心配置文件找到映射文件
⑥编写测试类并运行
创建com.itheima.test.MybatisTest类
package com.itheima.test;

import com.itheima.domain.User;
import org.apache.ibatis.io.Resources;
import org.apache.ibatis.session.SqlSession;
import org.apache.ibatis.session.SqlSessionFactory;
import org.apache.ibatis.session.SqlSessionFactoryBuilder;
import org.junit.Test;

import java.io.IOException;
import java.io.InputStream;
import java.util.List;


public class MybatisTest {

    @Test
    public void test1 () throws IOException {
        // 获得核心配置文件
        InputStream resourceAsStream = Resources.getResourceAsStream("SqlMapConfig.xml");
        // 获得Session工厂对象
        SqlSessionFactory sqlSessionFactory = new SqlSessionFactoryBuilder().build(resourceAsStream);
        // 获得Session会话对象
        SqlSession sqlSession = sqlSessionFactory.openSession();
        // 执行操作 参数:namespace.id
        List<User> userList = sqlSession.selectList("userMapper.findAll");
        // 打印数据
        System.out.println(userList);
        // 释放资源
        sqlSession.close();
    }

}
2
3
4
5
6
7
8
9
10
11
12
13
14
15
16
17
18
19
20
21
22
23
24
25
26
27
28
29
30
31
32
33
到这一步,编写部分结束,就可以正式运行Mybatis了。
# 遇到的问题
①Could not find resource SqlMapConfig.xml
这个问题是找不到SqlMapConfig.xml文件,这一步的原因是因为课程上设置在Resources文件夹内部再次建立了一个子文件夹src/main/resources/com.itheima.mapper,而导致resources文件夹下面没有相对应的配置文件,解决办法是将子文件夹修改成为resources类型的文件夹;或者将配置文件全部移出到resources的直接目录下。
②Please initialize the log4j system properly.
这个问题是请正确初始化log4j系统。发生原因是因为log4j没有被正确初始化,这一问题课程中没有提到。解决办法是在resources类型的文件夹下创建一个配置文件log4j.properties,文件内部的编写如下:
log4j.rootLogger=WARN, stdout
log4j.appender.stdout=org.apache.log4j.ConsoleAppender
log4j.appender.stdout.layout=org.apache.log4j.PatternLayout
log4j.appender.stdout.layout.ConversionPattern=%d %p [%c] - %m%n
2
3
4
这样添加之后,错误警告就会消失了。
# 知识总结
①添加Mybatis的坐标:一定需要要导入的是mysql-connector-java坐标和Mybatis坐标
②创建User数据表:在数据库中编写
③创建User实体类:编写对应数据表中数据的实体
④编写映射文件UserMapper.xml
<mapper namespace="userMapper">
    <select id="findAll" resultType="com.itheima.domain.User">
        select * from user
    </select>
</mapper>
2
3
4
5
映射文件中,mapper标签中出现了名字空间,添加名字空间是为了调用其中的findAll操作,形成调用关系,方便使用
⑤编写核心文件SqlMapConfig.xml
这一部配置数据源信息,加载映射配置文件。加载映射文件的时候需要使用的是路径名,而不是全限定名。
⑥编写测试类并运行
// 获得核心配置文件
InputStream resourceAsStream = Resources.getResourceAsStream("SqlMapConfig.xml");
// 获得Session工厂对象
SqlSessionFactory sqlSessionFactory = new SqlSessionFactoryBuilder().build(resourceAsStream);
// 获得Session会话对象
SqlSession sqlSession = sqlSessionFactory.openSession();
// 执行操作 参数:namespace.id
List<User> userList = sqlSession.selectList("userMapper.findAll");
// 打印数据
System.out.println(userList);
// 释放资源
sqlSession.close();
2
3
4
5
6
7
8
9
10
11
12
核心文件的编写一样分为六个步骤,每一个步骤都需要调用相对应的方法,比较复杂。
# 十九、Mybatis的映射文件概述
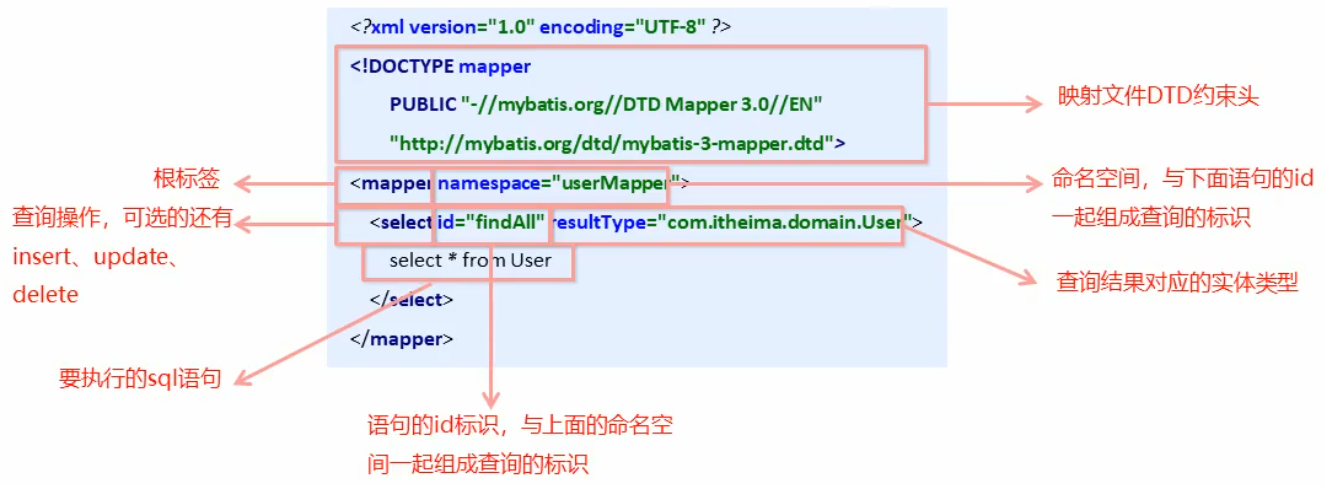
整个映射文件的解释概述如下图所示:
# 二十、Mybatis的增删改查操作CRUD
# 查询操作
首先在UserMapper.xml文件中添加查询语句的标签,添加在mapper标签内部。
<!--查询操作-->
<select id="findAll" resultType="com.itheima.domain.User">
    select * from user
</select>
2
3
4
然后在com.itheima.test.MybatisTest类中执行测试代码
@Test
public void test1 () throws IOException {
    // 获得核心配置文件
    InputStream resourceAsStream = Resources.getResourceAsStream("SqlMapConfig.xml");
    // 获得Session工厂对象
    SqlSessionFactory sqlSessionFactory = new SqlSessionFactoryBuilder().build(resourceAsStream);
    // 获得Session会话对象
    SqlSession sqlSession = sqlSessionFactory.openSession();
    // 执行操作 参数:namespace.id
    List<User> userList = sqlSession.selectList("userMapper.findAll");
    // 打印数据
    System.out.println(userList);
    // 释放资源
    sqlSession.close();
}
2
3
4
5
6
7
8
9
10
11
12
13
14
15
这个时候就会返回一个已经被封装好的结果集List
# 插入操作
和之前的查询操作一样,将下面的标签添加到<mapper namespace="userMapper"></mapper>标签组内部。插入数据的占位符使用#{Entity properties name}(实体属性名)格式。
<!--插入操作-->
<insert id="save" parameterType="com.itheima.domain.User">
    insert into user values(#{id}, #{username}, #{password})
</insert>
2
3
4
但是因为插入操作需要创建一个插入的对象集合,这个时候我们创建一个需要被插入的对象实例,然后将这个实例的数据设置好,之后执行插入操作。
@Test
public void test2 () throws IOException {
    // 模拟一个对象
    User user = new User();
    user.setUsername("Tom");
    user.setPassword("123456");
    // 获得核心配置文件
    InputStream resourceAsStream = Resources.getResourceAsStream("SqlMapConfig.xml");
    // 获得Session工厂对象
    SqlSessionFactory sqlSessionFactory = new SqlSessionFactoryBuilder().build(resourceAsStream);
    // 获得Session会话对象
    SqlSession sqlSession = sqlSessionFactory.openSession();
    // 执行操作 参数:namespace.id
    sqlSession.insert("userMapper.save", user);
    // 这个时候执行完毕如果直接进数据库视图查看,并没有成功插入数据
    // 因为没有提交事务,解决如下:
    // Mybatis需要执行更新操作,需要提交事务
    sqlSession.commit();
    // 释放资源
    sqlSession.close();
}
2
3
4
5
6
7
8
9
10
11
12
13
14
15
16
17
18
19
20
21
因为插入操作涉及到数据的更新,所以在执行之后数据库并没有立马更新,而是需要执行提交事务操作之后才会更新。
插入操作注意事项
- 插入语句使用 insert 标签
- 在映射文件中使用 parameterType 属性指定要插入的数据类型
- sql 语句中使用
#{实体属性名}方式引用实体中的属性值 - 插入操作使用的 API 是
sqISession.insert(“ 命名空间.id",实体对象); - 插入操作涉及数据库数据变化,所以要使用 sqISession 对象显示的提交事务,即
sqlSession.commit()
# 修改操作
修改操作使用update标签,使用的是sqlSession.update("命名空间.id",实体对象);
UserMapper.xml文件和测试代码如下所示
<!--修改操作-->
<update id="update" parameterType="com.itheima.domain.User">
    update user set username = #{username}, password = #{password} where id = #{id}
</update>
2
3
4
@Test
// 修改操作
public void test3 () throws IOException {
    // 模拟一个对象
    User user = new User();
    user.setId(7);
    user.setUsername("Lucy");
    user.setPassword("123");
    // 获得核心配置文件
    InputStream resourceAsStream = Resources.getResourceAsStream("SqlMapConfig.xml");
    // 获得Session工厂对象
    SqlSessionFactory sqlSessionFactory = new SqlSessionFactoryBuilder().build(resourceAsStream);
    // 获得Session会话对象
    SqlSession sqlSession = sqlSessionFactory.openSession();
    // 执行操作 参数:namespace.id
    sqlSession.insert("userMapper.update", user);
    // Mybatis需要执行更新操作,需要提交事务
    sqlSession.commit();
    // 释放资源
    sqlSession.close();
}
2
3
4
5
6
7
8
9
10
11
12
13
14
15
16
17
18
19
20
21
由于涉及数据的改动,同样需要提交事务才能真正修改。
# 删除操作
①删除操作使用delete标签;②删除操作sql语句使用#{任意字符串}方式引用传递的单个参数;③使用的API是sqlSession.delete("命名空间.id", Object);
<!--删除操作-->
<delete id="delete" parameterType="java.lang.Integer">
    delete from user where id=#{id}
</delete>
2
3
4
@Test
// 删除操作
public void test4 () throws IOException {
    // 获得核心配置文件
    InputStream resourceAsStream = Resources.getResourceAsStream("SqlMapConfig.xml");
    // 获得Session工厂对象
    SqlSessionFactory sqlSessionFactory = new SqlSessionFactoryBuilder().build(resourceAsStream);
    // 获得Session会话对象
    SqlSession sqlSession = sqlSessionFactory.openSession();
    // 执行操作 参数:namespace.id
    sqlSession.insert("userMapper.delete", 7);
    // Mybatis需要执行更新操作,需要提交事务
    sqlSession.commit();
    // 释放资源
    sqlSession.close();
}
2
3
4
5
6
7
8
9
10
11
12
13
14
15
16
# 二十一、Mybatis核心配置文件
# 常用配置解析
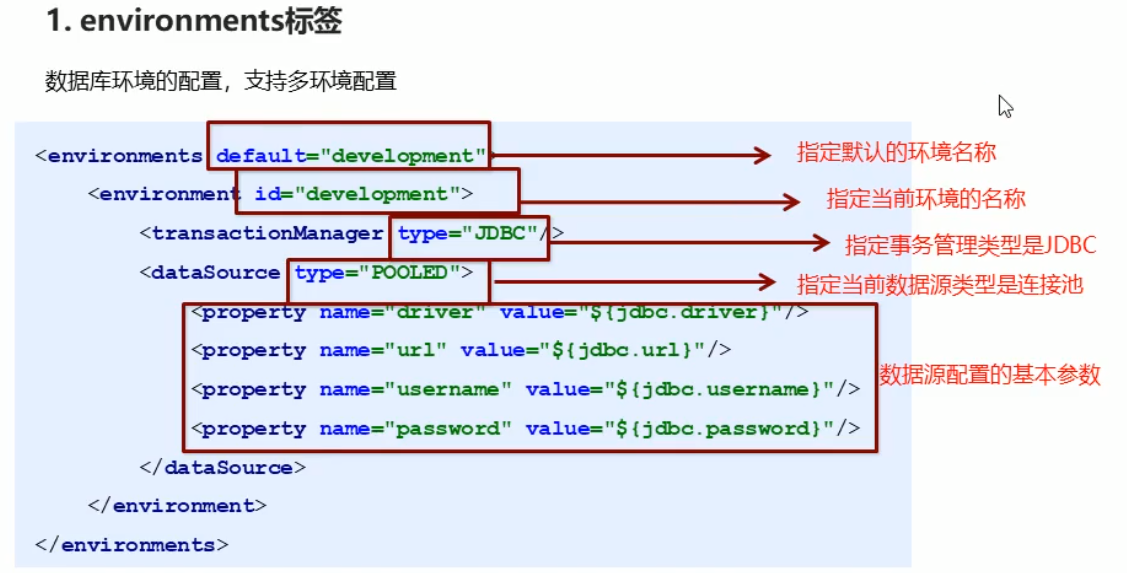
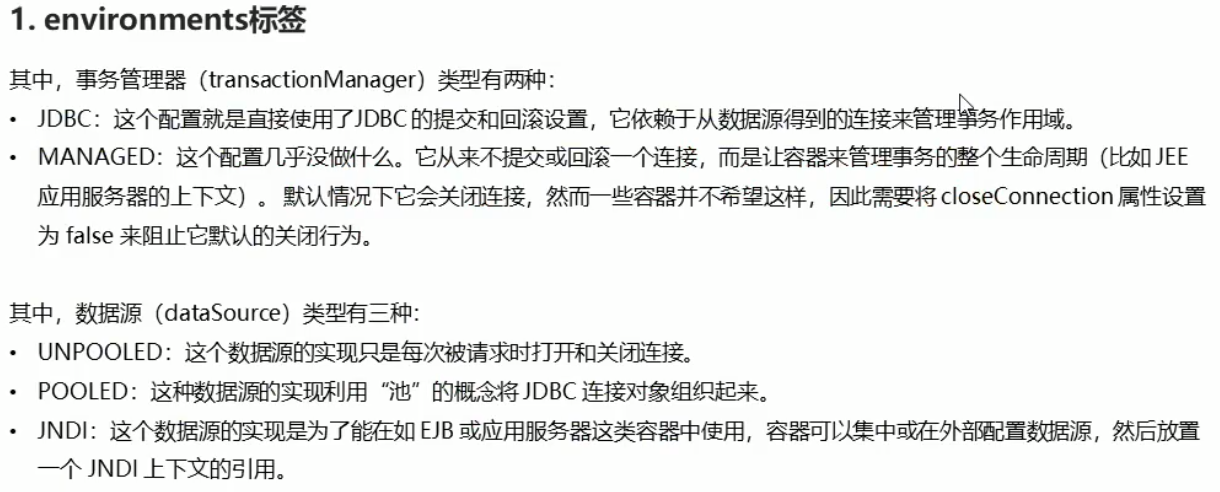


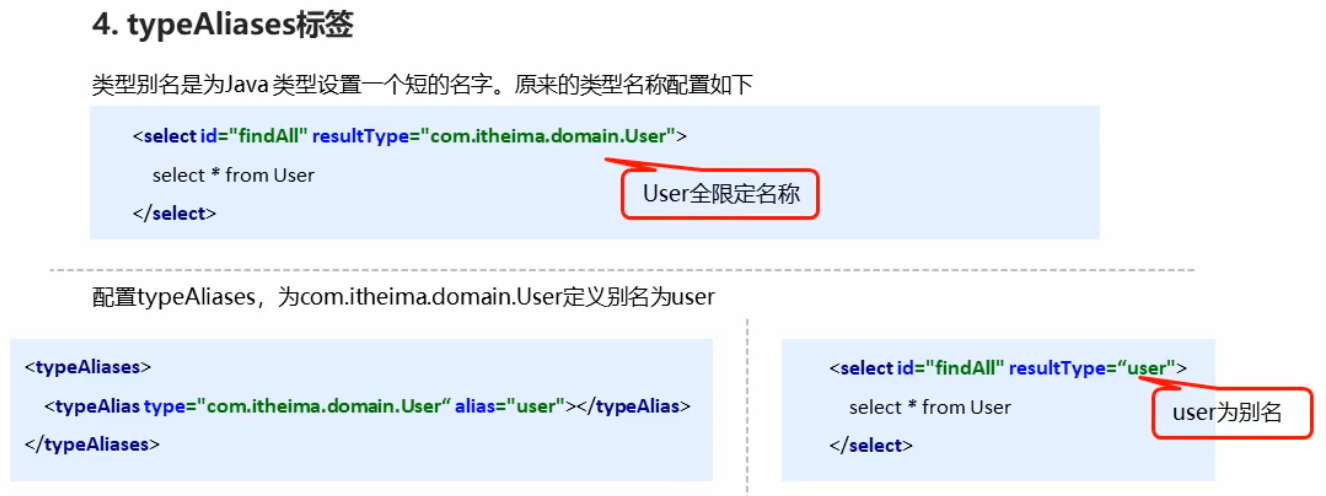
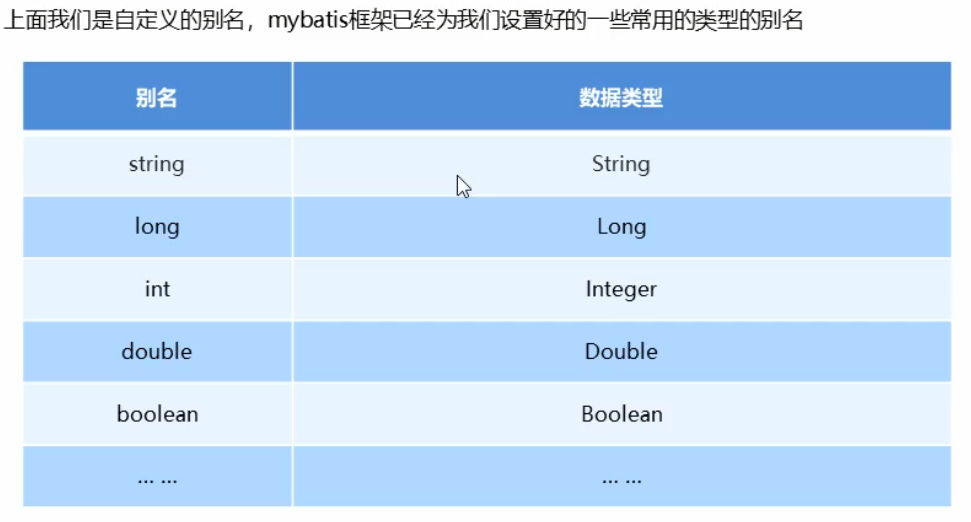
所以在使用的时候,之前删除操作中的java.lang.Integer也可以改成int
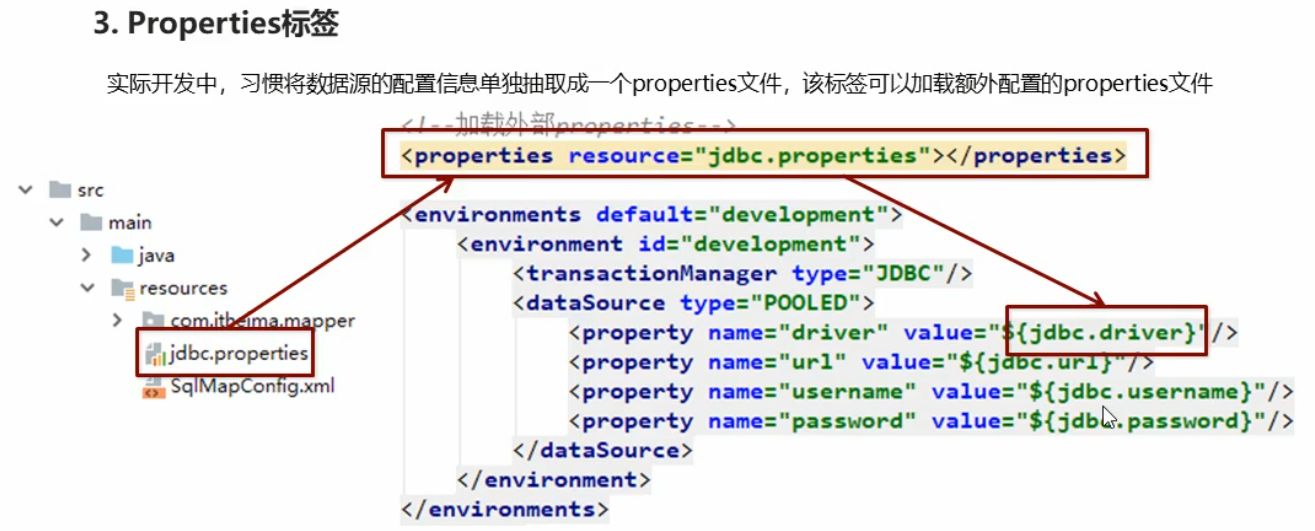
在使用的时候,通常使用在核心配置文件中。
<!--加载外部properties文件-->
<properties resource="jdbc.properties"/>

<!--定义别名,需要放到properties后面,放到靠前的位置,否则报错不匹配-->
<typeAliases>
    <typeAlias type="com.itheima.domain.User" alias="user"/>
</typeAliases>
2
3
4
5
6
7
一般要放在比较靠前的位置,放在后面可能会报错,提示configuration标签内的子标签必须按照一定的顺序配置。
# 知识总结
# 二十二、Mybatis相应API
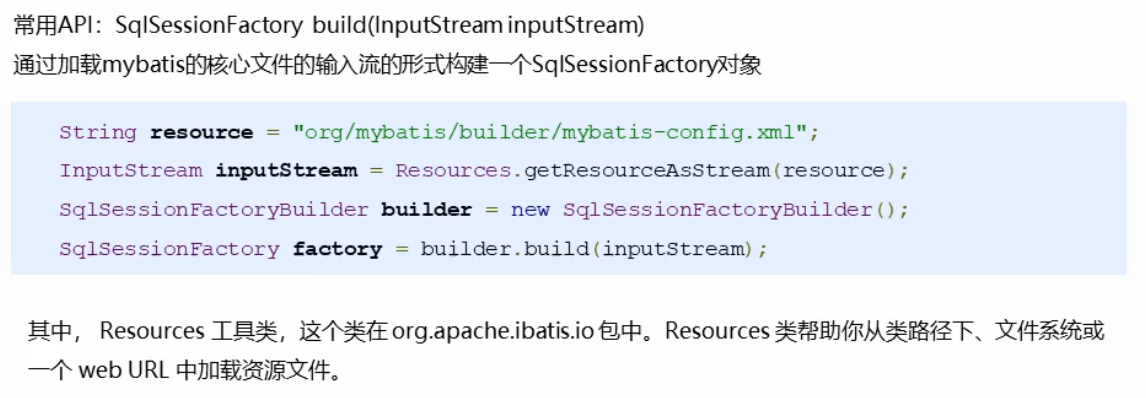
# SqlSession工厂构建器SqlSessionFactoryBuilder
# SqlSession工厂对象SqlSessionFactory
SqlSessionFactory有多个方法创建SqlSession实例,常用 的方法有两个:

选择了打开事务提交,就不需要后面手动地提交事务了。
SqlSession sqlSession = sqlSessionFactory.openSession(true);
// sqlSession.commit();
2
根据id等进行查询操作
首先在UserMapper.xml文件中添加根据id查询的配置文件块。
<!--根据ID进行查询-->
<select id="findById" resultType="com.itheima.domain.User" parameterType="int">
    select * from user where id = #{id}
</select>
2
3
4
之后再在测试类中添加测试代码,具体如下
@Test
// 根据id进行查询操作
public void test5 () throws IOException {
    // 获得核心配置文件
    InputStream resourceAsStream = Resources.getResourceAsStream("SqlMapConfig.xml");
    // 获得Session工厂对象
    SqlSessionFactory sqlSessionFactory = new SqlSessionFactoryBuilder().build(resourceAsStream);
    // 获得Session会话对象
    SqlSession sqlSession = sqlSessionFactory.openSession();
    // 执行操作 参数:namespace.id
    User user = sqlSession.selectOne("UserMapper.findById");
    // 打印数据
    System.out.println(user);
    // 释放资源
    sqlSession.close();
}
2
3
4
5
6
7
8
9
10
11
12
13
14
15
16
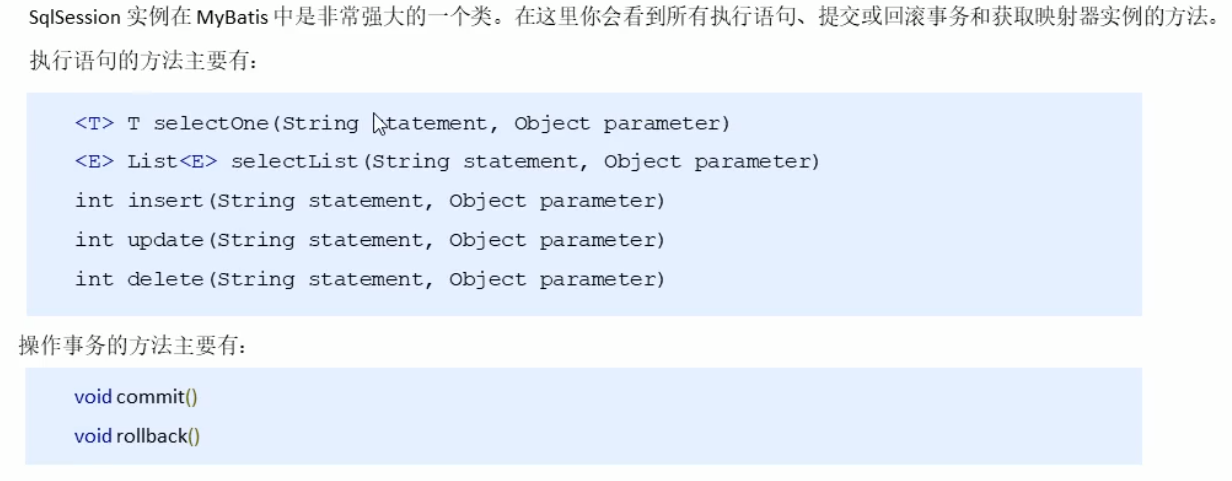
# SqlSession会话对象
# 二十三、Mybatis的dao层实现
# 传统实现方法
①编写dao层实现接口

public interface UserMapper {

    public List<User> findAll() throws IOException;
}
2
3
4
public class UserMapperImpl implements UserMapper {
    @Override
    public List<User> findAll() throws IOException {
        InputStream resourceAsStream = Resources.getResourceAsStream("SqlMapConfig.xml");
        SqlSessionFactory sqlSessionFactory = new SqlSessionFactoryBuilder().build(resourceAsStream);
        SqlSession sqlSession = sqlSessionFactory.openSession();
        List<User> userList = sqlSession.selectList("UserMapper.findAll");
        return userList;
    }
}
2
3
4
5
6
7
8
9
10
②创建main方法运行
public class ServiceDemo {

    public static void main(String[] args) throws IOException {

        // 创建dao层对象 当前dao层的创建是手动实现的
        UserMapper userMapper = new UserMapperImpl();
        List<User> all = userMapper.findAll();

        System.out.println(all);

    }

}
2
3
4
5
6
7
8
9
10
11
12
13
之前的User以及UserMapper.xml等文件跟之前的项目保持一致。
# 代理开发方式


①UserMapper.xml文件中的namespace与mapper的接口全限定名相同
即namespace="com.itheima.dao.UserMapper"命名空间的值和接口的全限定名是一样的。
<mapper namespace="com.itheima.dao.UserMapper">

    <!--查询操作-->
    <select id="findAll" resultType="user">
        select * from user
    </select>

</mapper>
2
3
4
5
6
7
8
public interface UserMapper {

    public List<User> findAll() throws IOException;
}
2
3
4
②Mapper接口方法名和Mapper.xml中定义的每个Statement的id相同
<!--查询操作-->
<select id="findAll" resultType="user">
    select * from user
</select>
2
3
4
查询操作的statement的id为findAll,在Mapper接口方法中,方法名一样也是findAll
public List<User> findAll() throws IOException;
③Mapper接口方法的输入参数要和Mapper.xml中定义的每个sql的parameterType相同
因为上述的接口方法中无参数,所以在UserMapper.xml文件中同样无参数。
④Mapper接口方法的输出参数要和Mapper.xml中定义的每个sql的resultType相同
接口方法的输出参数是User类型的集合
public List<User> findAll() throws IOException;
UserMapper.xml文件中定义的sql语句的返回类型也是User类,所以二者是一样的。
实际操作
①在UserMapper.xml文件中添加相应的sql语句的statement
<!--根据id查询-->
<select id="findById" parameterType="int" resultType="user">
    select * from user where id = #{id}
</select>
2
3
4
②在UserMapper的接口文件中添加相关的接口方法
public User findById(int id);
根据之前的四个原则,要符合相关的条件,函数名以及返回值、参数均不能随意更改
③在ServiceDemo类中运行
InputStream resourceAsStream = Resources.getResourceAsStream("sqlMapConfig.xml");
SqlSessionFactory sqlSessionFactory = new SqlSessionFactoryBuilder().build(resourceAsStream);
SqlSession sqlSession = sqlSessionFactory.openSession();

UserMapper mapper = sqlSession.getMapper(UserMapper.class);
User user = mapper.findById(1);
System.out.println(user);
2
3
4
5
6
7
执行结果如下
Loading class
com.mysql.jdbc.Driver'. This is deprecated. The new driver class iscom.mysql.cj.jdbc.Driver'. The driver is automatically registered via the SPI and manual loading of the driver class is generally unnecessary. User{id=1, username='zhangsan', password='123'}
正常运行
# 知识小结
Mybatis的Dao层的两种实现方式
①手动对Dao进行实现:传统实现方法
②代理开发方式
UserMapper userMapper = sqlSession.getMapper(UserMapper.class);

在连接数据库的时候,出现了几个问题,在这里总结一下
①No suitable driver found for jdbc:myql://localhost:3306/test
仔细观察之后发现是因为自己mysql这几个字母打错了
②Could not create connection to database server.
连接不上数据库服务器,后来发现是因为版本号不匹配导致的。本地电脑中安装的MySQL的版本号是8.0.23,后来通过将pom.xml文件中的依赖版本修改成8.0.23之后,成功解决。
<dependency>
    <groupId>mysql</groupId>
    <artifactId>mysql-connector-java</artifactId>
    <version>8.0.23</version>
</dependency>
2
3
4
5
# 二十四、Mybatis映射文件深入
# 动态sql语句
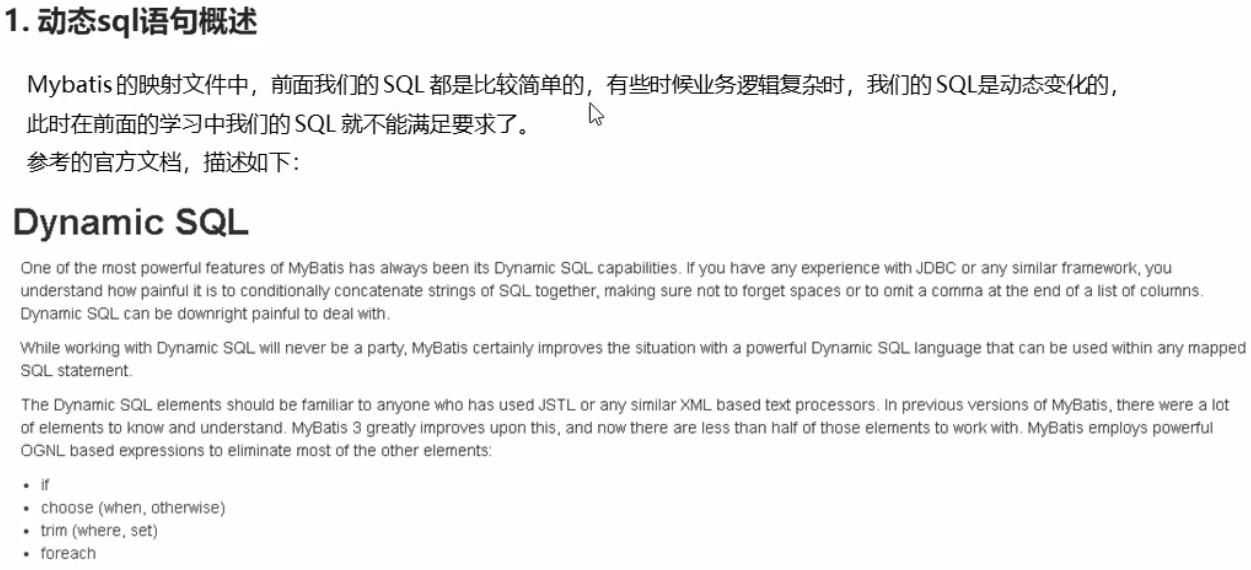
实际操作
①创建一个新的项目itheima_mybatis_mapper
创建一个domain包,下面是User类
创建一个mapper包,下面是对应的UserMapper接口
public interface UserMapper {

    public List<User> findByCondition(User user);

}
2
3
4
5
②在UserMapper.xml文件中,添加下面的代码
<mapper namespace="com.itheima.mapper.UserMapper">

    <select id="findByCondition" resultType="user" parameterType="user">
        select * from user where id=#{id} and username=#{username} and password=#{password}
    </select>

</mapper>
2
3
4
5
6
7
③在test下面新建一个test类,全限定名为com.itheima.test.MapperTest
public class MapperTest {

    @Test
    public void test1() throws IOException {
        InputStream resourceAsStream = Resources.getResourceAsStream("sqlMapConfig.xml");
        SqlSessionFactory sqlSessionFactory = new SqlSessionFactoryBuilder().build(resourceAsStream);
        SqlSession sqlSession = sqlSessionFactory.openSession();

        UserMapper mapper = sqlSession.getMapper(UserMapper.class);
        // 模拟条件
        User condition = new User();
        condition.setId(1);
        condition.setUsername("zhangsan");
        condition.setPassword("123");
        List<User> userList = mapper.findByCondition(condition);
        System.out.println(userList);
    }

}
2
3
4
5
6
7
8
9
10
11
12
13
14
15
16
17
18
19
④在log4j.properties文件中将对应的参数修改成
log4j.rootLogger=debug, stdout
⑤运行test方法,可以输出结果以及相关的日志文件
2021-04-12 18:56:43,764 DEBUG [org.apache.ibatis.datasource.pooled.PooledDataSource] - Created connection 1097619701. 2021-04-12 18:56:43,765 DEBUG [org.apache.ibatis.transaction.jdbc.JdbcTransaction] - Setting autocommit to false on JDBC Connection [com.mysql.cj.jdbc.ConnectionImpl@416c58f5] 2021-04-12 18:56:43,770 DEBUG [com.itheima.mapper.UserMapper.findByCondition] - ==> Preparing: select * from user where id=? and username=? and password=? 2021-04-12 18:56:43,833 DEBUG [com.itheima.mapper.UserMapper.findByCondition] - ==> Parameters: 1(Integer), zhangsan(String), 123(String) 2021-04-12 18:56:43,911 DEBUG [com.itheima.mapper.UserMapper.findByCondition] - <== Total: 1 [User{id=1, username='zhangsan', password='123'}]
其中有select * from user where id=? and username=? and password=?以及1(Integer), zhangsan(String), 123(String)两条语句,可以看出在实际执行过程中Mybatis的操作。
# 动态Sql的<if>语句
上面的项目是普通的查询方法,并没有用到动态的sql语句。
<select id="findByCondition" resultType="user" parameterType="user">
    select * from user where id=#{id} and username=#{username} and password=#{password}
</select>
2
3
在这个语句中,如果用户查询的条件中缺少必要的条件,那么最终会导致查询失败。这样的使用不符合实际的使用情况。
这里我们引入<if>标签,引入动态sql语句的概念。
我们根据实体类的不同取值,使用不同的Sql语句来进行查询。比如在id如果不为空时可以根据id查询,如果username不为空时还要加入用户名为条件。这种情况在我们的多条件组合查询中经常会碰到。
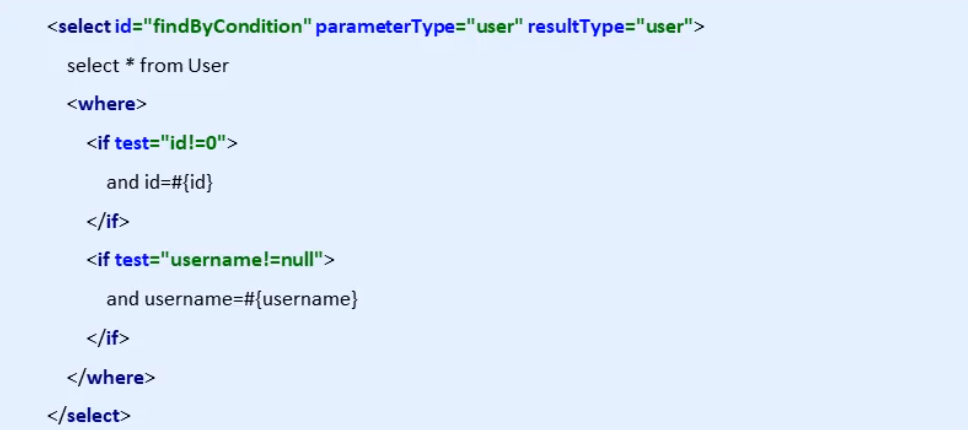
实际使用中,使用if标签,可以实现多条件组合查询
在test类中,如果注释掉password一行语句,不使用if将返回空值
@Test
public void test1() throws IOException {
    InputStream resourceAsStream = Resources.getResourceAsStream("sqlMapConfig.xml");
    SqlSessionFactory sqlSessionFactory = new SqlSessionFactoryBuilder().build(resourceAsStream);
    SqlSession sqlSession = sqlSessionFactory.openSession();

    UserMapper mapper = sqlSession.getMapper(UserMapper.class);
    // 模拟条件
    User condition = new User();
    condition.setId(1);
    condition.setUsername("zhangsan");
    // condition.setPassword("123");
    List<User> userList = mapper.findByCondition(condition);
    System.out.println(userList);
}
2
3
4
5
6
7
8
9
10
11
12
13
14
15
在使用if标签,UserMapper.xml文件中,修改成下面的形式
<select id="findByCondition" resultType="user" parameterType="user">
    select * from user where 1 = 1
    <if test="id != 0">
        and id = #{id}
    </if>
    <if test="username != null">
        and username = #{username}
    </if>
    <if test="password != null">
        and password = #{password}
    </if>
</select>
2
3
4
5
6
7
8
9
10
11
12
最终的运行结果如下所示:
可以看到在log中没有出现password=?的匹配内容,实际使用中也就是说如果为空的时候,将不会运行if标签内的语句。
2021-04-12 20:07:13,588 DEBUG [com.itheima.mapper.UserMapper.findByCondition] - ==> Preparing: select * from user where 1 = 1 and id = ? and username = ? 2021-04-12 20:07:13,646 DEBUG [com.itheima.mapper.UserMapper.findByCondition] - ==> Parameters: 1(Integer), zhangsan(String) 2021-04-12 20:07:13,712 DEBUG [com.itheima.mapper.UserMapper.findByCondition] - <== Total: 1 [User{id=1, username='zhangsan', password='123'}]
如果注释掉setname那一行语句,则最终运行结果将如下所示:
2021-04-12 20:12:08,169 DEBUG [com.itheima.mapper.UserMapper.findByCondition] - ==> Preparing: select * from user where 1 = 1 and id = ? 2021-04-12 20:12:08,240 DEBUG [com.itheima.mapper.UserMapper.findByCondition] - ==> Parameters: 1(Integer) 2021-04-12 20:12:08,308 DEBUG [com.itheima.mapper.UserMapper.findByCondition] - <== Total: 1 [User{id=1, username='zhangsan', password='123'}]
同样的,name一行的匹配不出现。
在真正的实际开发中,我们不使用where 1=1的语句,这样可能在一些场合中造成sql语句注入的情况(虽然使用PreparedStatement语句可以避免)。在语句标签内部,提供了一个where标签,我们将where标签放在if条件标签整体的外部即可。
<!--查询语句-->
<select id="findByCondition" resultType="user" parameterType="user">
    select * from user
    <where>
        <if test="id != 0">
            and id = #{id}
        </if>
        <if test="username != null">
            and username = #{username}
        </if>
        <if test="password != null">
            and password = #{password}
        </if>
    </where>
</select>
2
3
4
5
6
7
8
9
10
11
12
13
14
15
# 动态Sql的<foreach>语句
<foreach>在这里是循环执行sql的拼接操作,适用于MySQL中的查询集合语句
select * from user where id in (1,2,4);
这种情况下需要使用到这一标签。
UserMapper.xml文件中的配置如下
<!--查询语句-->
<select id="findByIds" parameterType="list" resultType="user">
    select * from user
    <where>
        <foreach collection="list" open="id in(" close=")" item="id" separator=",">
            #{id}
        </foreach>
    </where>
</select>
2
3
4
5
6
7
8
9
一样遵照之前的四个规则:①名字空间和接口的全限定名一致;②sql语句块的id和方法名字一致;③参数类型和ParametreType一样;④返回值类型和ResultType一样
测试类型编写如下:
InputStream resourceAsStream = Resources.getResourceAsStream("sqlMapConfig.xml");
SqlSessionFactory sqlSessionFactory = new SqlSessionFactoryBuilder().build(resourceAsStream);
SqlSession sqlSession = sqlSessionFactory.openSession();

UserMapper mapper = sqlSession.getMapper(UserMapper.class);
// 模拟ids的数据
List<Integer> ids = new ArrayList<Integer>();
ids.add(1);
ids.add(2);
List<User> userList = mapper.findByIds(ids);
System.out.println(userList);
2
3
4
5
6
7
8
9
10
11
运行结果如下:
2021-04-13 23:20:54,854 DEBUG [org.apache.ibatis.datasource.pooled.PooledDataSource] - Created connection 1690713209. 2021-04-13 23:20:54,854 DEBUG [org.apache.ibatis.transaction.jdbc.JdbcTransaction] - Setting autocommit to false on JDBC Connection [com.mysql.cj.jdbc.ConnectionImpl@64c63c79] 2021-04-13 23:20:54,860 DEBUG [com.itheima.mapper.UserMapper.findByIds] - ==> Preparing: select * from user WHERE id in( ? , ? ) 2021-04-13 23:20:54,936 DEBUG [com.itheima.mapper.UserMapper.findByIds] - ==> Parameters: 1(Integer), 2(Integer) 2021-04-13 23:20:54,985 DEBUG [com.itheima.mapper.UserMapper.findByIds] - <== Total: 2 [User{id=1, username='zhangsan', password='123'}, User{id=2, username='lisi', password='123'}]
# sql片段的抽取
sql语句在使用标签的时候经常会出现,为了解耦合的需求,我们可以进行sql语句片段的抽取
在UserMapper.xml文件中的<mapper>标签添加标签<sql>然后添加标签的id,之后再在需要使用的地方添加include标签,引用的id就是之前设置的sql语句标签的id
<!--sql语句的抽取-->
<sql id="selectUser">select * from user</sql>
2
<!--查询语句-->
<select id="findByIds" parameterType="list" resultType="user">
    <include refid="selectUser"></include>
    <where>
        <foreach collection="list" open="id in(" close=")" item="id" separator=",">
            #{id}
        </foreach>
    </where>
</select>
2
3
4
5
6
7
8
9
# 知识小结
常用的标签包含下面这些:sql——sql语句片段的抽取
| select | insert | update | delete | where | if | foreach |
|---|---|---|---|---|---|---|
| 查询 | 插入 | 更新 | 删除 | where标签 | if判断 | 循环 |
# 二十五、Mybatis核心配置文件深入
# typeHandles标签
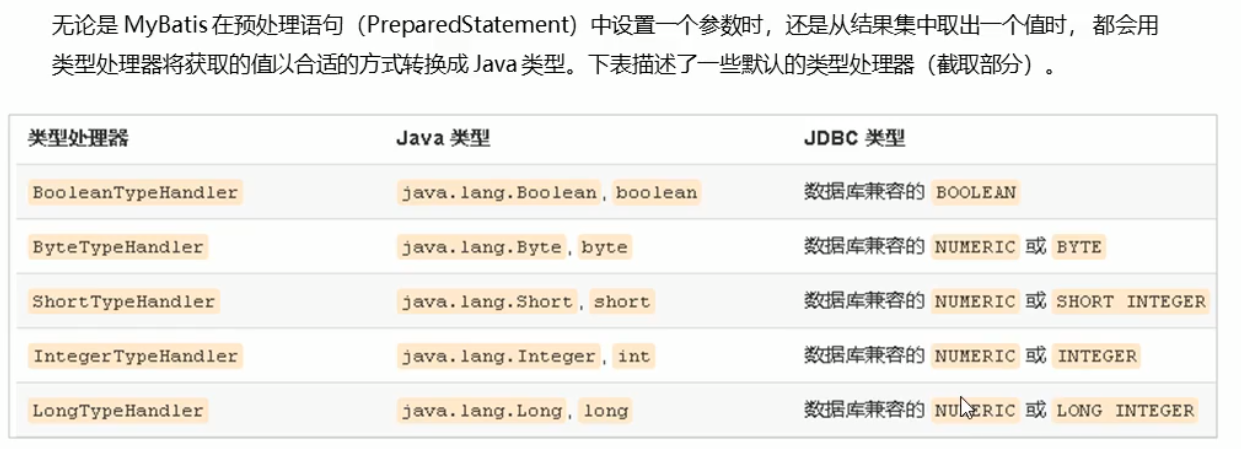
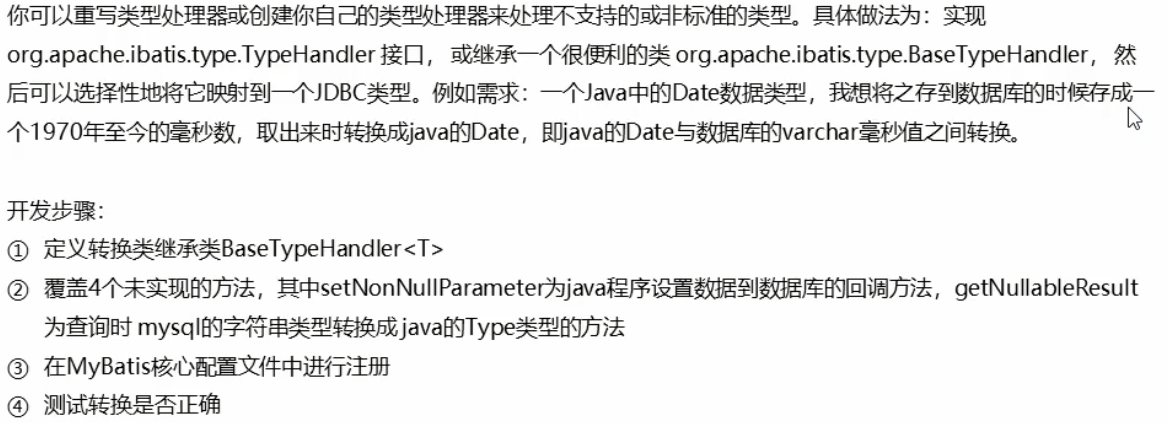
实际使用过程
①在User类中添加新的birthday类型值,并添加对应的get和set方法
private Date birthday;
②在mapper映射文件中添加相应的sql操作标签语句
<!--插入操作-->
<insert id="save" parameterType="user">
    insert into user values (#{id}, #{username}, #{password}, #{birthday})
</insert>
2
3
4
③在测试类中编写如下
@Test
public void test1() throws IOException {
    InputStream resourceAsStream = Resources.getResourceAsStream("sqlMapConfig.xml");
    SqlSessionFactory sqlSessionFactory = new SqlSessionFactoryBuilder().build(resourceAsStream);
    SqlSession sqlSession = sqlSessionFactory.openSession(true);

    UserMapper userMapper = sqlSession.getMapper(UserMapper.class);
    // 创造User对象,此处数据库设置主键id自增长
    User user = new User();
    user.setUsername("test");
    user.setPassword("123");
    user.setBirthday(new Date());
    // 执行保存操作
    userMapper.save(user);

    sqlSession.close();
}
2
3
4
5
6
7
8
9
10
11
12
13
14
15
16
17
这个时候会触发Error,因为实际的情况中因为类型的问题,不能直接将bigint的类型数据值(Mysql中的birthday属性值是一个bigint类型)转换为一个date类型,会提示SqlException。此时需要运行我们的自定义类型处理器。
具体步骤:
①创建一个新的类,全限定名为com.itheima.handler.DateTypeHandler
public class DateTypeHandler extends BaseTypeHandler<Date> {
    // 将java类型转换为数据库需要的类型
    @Override
    public void setNonNullParameter(PreparedStatement preparedStatement, int i, Date date, JdbcType jdbcType) throws SQLException {
        long time = date.getTime();
        preparedStatement.setLong(i, time);
    }

    // 将数据库中的类型转换成java的类型
    @Override
    // String 是数据库中要转换的字段的名称
    // ResultSet 是查询出的结果集
    public Date getNullableResult(ResultSet resultSet, String s) throws SQLException {
        // 获取结果集中需要的数据 Long 转换成 date 类型并返回
        long aLong = resultSet.getLong(s);
        Date date = new Date(aLong);
        return date;
    }

    // 将数据库中的类型转换成java的类型
    @Override
    public Date getNullableResult(ResultSet resultSet, int i) throws SQLException {
        long aLong = resultSet.getLong(i);
        Date date = new Date(aLong);
        return date;
    }

    // 将数据库中的类型转换成java的类型
    @Override
    public Date getNullableResult(CallableStatement callableStatement, int i) throws SQLException {
        long aLong = callableStatement.getLong(i);
        Date date = new Date(aLong);
        return date;
    }
}
2
3
4
5
6
7
8
9
10
11
12
13
14
15
16
17
18
19
20
21
22
23
24
25
26
27
28
29
30
31
32
33
34
35
②在SqlMapConfig.xml文件中配置自定义类型处理器的注册
<!--定义别名,需要放到properties后面,放到靠前的位置,否则报错不匹配-->
<typeAliases>
    <typeAlias type="com.itheima.domain.User" alias="user"/>
</typeAliases>

<!--注册自定义类型处理器-->
<typeHandlers>
    <typeHandler handler="com.itheima.handler.DateTypeHandler"/>
</typeHandlers>

<!--配置数据源环境-->
2
3
4
5
6
7
8
9
10
11
根据具体情况,这些标签在environments标签内需要注意顺序,不能随意更换顺序。
③运行之前的测试类MapperTest
public class MapperTest {

    @Test
    public void test1() throws IOException {
        InputStream resourceAsStream = Resources.getResourceAsStream("sqlMapConfig.xml");
        SqlSessionFactory sqlSessionFactory = new SqlSessionFactoryBuilder().build(resourceAsStream);
        SqlSession sqlSession = sqlSessionFactory.openSession(true);

        UserMapper userMapper = sqlSession.getMapper(UserMapper.class);
        // 创造User对象,此处数据库设置主键id自增长
        User user = new User();
        user.setUsername("test");
        user.setPassword("123");
        user.setBirthday(new Date());
        // 执行保存操作
        userMapper.save(user);

        sqlSession.close();
    }

}
2
3
4
5
6
7
8
9
10
11
12
13
14
15
16
17
18
19
20
21
运行结果如下所示,数据库中成功添加数据,但是并没有正确显示成日期格式。翻看日志文件,其中关于插入的语句正确显示,也确实是将long类型的数据写入了数据库的bigint类型的数据中。
2021-04-14 00:34:15,987 DEBUG [org.apache.ibatis.datasource.pooled.PooledDataSource] - Created connection 1034909474. 2021-04-14 00:34:15,994 DEBUG [com.itheima.mapper.UserMapper.save] - ==> Preparing: insert into user values (?, ?, ?, ?) 2021-04-14 00:34:16,064 DEBUG [com.itheima.mapper.UserMapper.save] - ==> Parameters: 0(Integer), test(String), 123(String), 1618331655248(Long) 2021-04-14 00:34:16,073 DEBUG [com.itheima.mapper.UserMapper.save] - <== Updates: 1 2021-04-14 00:34:16,073 DEBUG [org.apache.ibatis.transaction.jdbc.JdbcTransaction] - Closing JDBC Connection [com.mysql.cj.jdbc.ConnectionImpl@3daf7722] 2021-04-14 00:34:16,073 DEBUG [org.apache.ibatis.datasource.pooled.PooledDataSource] - Returned connection 1034909474 to pool.
Process finished with exit code 0
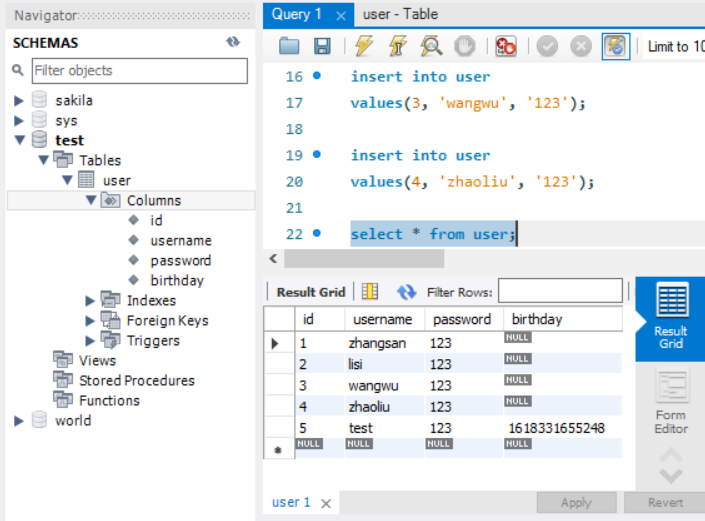
数据库中的查询数据是bigint类型,但是在Java中保存的是一个long类型,自定义的类型处理器就是将java中的类型转换成数据库中的数据类型。但是在查询数据的时候,为了真正实现需求,我们需要将数据转换成日期date格式的数据。
④在UserMapper接口文件中创建新的查询方法的接口,并且在UserMapper.xml文件中添加新的select标签,利用代理开发的方式自动创建实现Mybatis的dao层。
public interface UserMapper {

    public void save(User user);

    public User findById(int id);
}
2
3
4
5
6
<!--查询操作-->
<select id="findById" parameterType="int" resultType="user">
    select * from user where id = #{id}
</select>
2
3
4
⑤添加新的test方法
@Test
public void test2() throws IOException {
    InputStream resourceAsStream = Resources.getResourceAsStream("sqlMapConfig.xml");
    SqlSessionFactory sqlSessionFactory = new SqlSessionFactoryBuilder().build(resourceAsStream);
    SqlSession sqlSession = sqlSessionFactory.openSession(true);

    UserMapper userMapper = sqlSession.getMapper(UserMapper.class);

    User user = userMapper.findById(5);
    System.out.println("id为5的user的birthday:" + user.getBirthday());

    sqlSession.close();
}
2
3
4
5
6
7
8
9
10
11
12
13
运行的时候结果如下:
Loading class
com.mysql.jdbc.Driver'. This is deprecated. The new driver class iscom.mysql.cj.jdbc.Driver'. The driver is automatically registered via the SPI and manual loading of the driver class is generally unnecessary. 2021-04-14 00:49:51,424 DEBUG [org.apache.ibatis.datasource.pooled.PooledDataSource] - Created connection 45822040. 2021-04-14 00:49:51,429 DEBUG [com.itheima.mapper.UserMapper.findById] - ==> Preparing: select * from user where id = ? 2021-04-14 00:49:51,499 DEBUG [com.itheima.mapper.UserMapper.findById] - ==> Parameters: 5(Integer) 2021-04-14 00:49:51,607 DEBUG [com.itheima.mapper.UserMapper.findById] - <== Total: 1 id为5的user的birthday:Wed Apr 14 00:34:15 CST 2021 2021-04-14 00:49:51,610 DEBUG [org.apache.ibatis.transaction.jdbc.JdbcTransaction] - Closing JDBC Connection [com.mysql.cj.jdbc.ConnectionImpl@2bb3058] 2021-04-14 00:49:51,610 DEBUG [org.apache.ibatis.datasource.pooled.PooledDataSource] - Returned connection 45822040 to pool.Process finished with exit code 0
可以看到输出的结果已经正确显示为时间日期格式,可以正确正常使用。
# plugins标签
Mybatis可以使用第三方插件来对功能进行扩展,分页助手PageHelper是将分页的复杂操作进行封装,使用简单的方式即可获得分页的相关数据。
开发步骤:
①导入通用PageHelper的坐标
在pom.xml文件中导入相关的依赖坐标
<dependency>
    <groupId>com.github.pagehelper</groupId>
    <artifactId>pagehelper</artifactId>
    <version>3.7.5</version>
</dependency>
<dependency>
    <groupId>com.github.jsqlparser</groupId>
    <artifactId>jsqlparser</artifactId>
    <version>0.9.1</version>
</dependency>
2
3
4
5
6
7
8
9
10
②在Mybatis的核心配置文件中配置PageHelper插件
在SqlMapConfig.xml文件中配置插件
<!--配置分页助手插件-->
<plugins>
    <plugin interceptor="com.github.pagehelper.PageHelper">
        <property name="dialect" value="mysql"/>
    </plugin>
</plugins>
2
3
4
5
6
③测试分页数据获取
@Test
public void test3() throws IOException {
    InputStream resourceAsStream = Resources.getResourceAsStream("sqlMapConfig.xml");
    SqlSessionFactory sqlSessionFactory = new SqlSessionFactoryBuilder().build(resourceAsStream);
    SqlSession sqlSession = sqlSessionFactory.openSession(true);

    UserMapper userMapper = sqlSession.getMapper(UserMapper.class);

    // 设置分页相关的参数:当前页和每页显示的条数
    PageHelper.startPage(1, 3);

    // 查询全部
    List<User> userList  = userMapper.findAll();
    for (User user : userList) {
        System.out.println(user);
    }

    sqlSession.close();
}
2
3
4
5
6
7
8
9
10
11
12
13
14
15
16
17
18
19
查看下面的运行效果,可以看到出现了一条select * from user limit ?,?的sql语句,已经实现了分页查询。
Loading class
com.mysql.jdbc.Driver'. This is deprecated. The new driver class iscom.mysql.cj.jdbc.Driver'. The driver is automatically registered via the SPI and manual loading of the driver class is generally unnecessary. 2021-04-14 16:10:26,142 DEBUG [org.apache.ibatis.datasource.pooled.PooledDataSource] - Created connection 282003944. 2021-04-14 16:10:26,152 DEBUG [com.itheima.mapper.UserMapper.findAll_PageHelper_Count] - ==> Preparing: SELECT count(*) FROM user 2021-04-14 16:10:26,237 DEBUG [com.itheima.mapper.UserMapper.findAll_PageHelper_Count] - ==> Parameters: 2021-04-14 16:10:26,338 DEBUG [com.itheima.mapper.UserMapper.findAll_PageHelper_Count] - <== Total: 1 2021-04-14 16:10:26,341 DEBUG [com.itheima.mapper.UserMapper.findAll_PageHelper] - ==> Preparing: select * from user limit ?,? 2021-04-14 16:10:26,344 DEBUG [com.itheima.mapper.UserMapper.findAll_PageHelper] - ==> Parameters: 0(Integer), 3(Integer) 2021-04-14 16:10:26,354 DEBUG [com.itheima.mapper.UserMapper.findAll_PageHelper] - <== Total: 3 User{id=1, username='zhangsan', password='123', birthday=Thu Jan 01 08:00:00 CST 1970} User{id=2, username='lisi', password='123', birthday=Thu Jan 01 08:00:00 CST 1970} User{id=3, username='wangwu', password='123', birthday=Thu Jan 01 08:00:00 CST 1970} 2021-04-14 16:10:26,375 DEBUG [org.apache.ibatis.transaction.jdbc.JdbcTransaction] - Closing JDBC Connection [com.mysql.cj.jdbc.ConnectionImpl@10cf09e8] 2021-04-14 16:10:26,375 DEBUG [org.apache.ibatis.datasource.pooled.PooledDataSource] - Returned connection 282003944 to pool.Process finished with exit code 0
# 分页相关数据的获取
@Test
public void test3() throws IOException {
    InputStream resourceAsStream = Resources.getResourceAsStream("sqlMapConfig.xml");
    SqlSessionFactory sqlSessionFactory = new SqlSessionFactoryBuilder().build(resourceAsStream);
    SqlSession sqlSession = sqlSessionFactory.openSession(true);

    UserMapper userMapper = sqlSession.getMapper(UserMapper.class);

    // 设置分页相关的参数:当前页和每页显示的条数
    PageHelper.startPage(2, 3);

    // 查询全部
    List<User> userList  = userMapper.findAll();
    for (User user : userList) {
        System.out.println(user);
    }

    // 获得与分页相关的一些参数
    PageInfo<User> pageInfo = new PageInfo<User>(userList);
    System.out.println("当前页:" + pageInfo.getPageNum());
    System.out.println("每页显示的条数:" + pageInfo.getPageSize());
    System.out.println("总条数:" + pageInfo.getTotal());
    System.out.println("总页数:" + pageInfo.getPages());
    System.out.println("上一页:" + pageInfo.getPrePage());
    System.out.println("下一页:" + pageInfo.getNextPage());
    System.out.println("是否是第一页:" + pageInfo.isIsFirstPage());
    System.out.println("是否是最后一页:" + pageInfo.isIsLastPage());


    sqlSession.close();
}
2
3
4
5
6
7
8
9
10
11
12
13
14
15
16
17
18
19
20
21
22
23
24
25
26
27
28
29
30
31
对于分页助手这一插件,想要获取分页相关的参数,在插件中已经实现了相关功能的封装,能够实现相关数据的直接获取,利用PageInfo这一封装类即可。运行结果如下:
User{id=4, username='zhaoliu', password='123', birthday=Thu Jan 01 08:00:00 CST 1970} User{id=5, username='test', password='123', birthday=Wed Apr 14 00:34:15 CST 2021} 当前页:2 每页显示的条数:3 总条数:5 总页数:2 上一页:1 下一页:0 是否是第一页:false 是否是最后一页:true
# 知识小结
Mybatis核心配置文件常用标签:
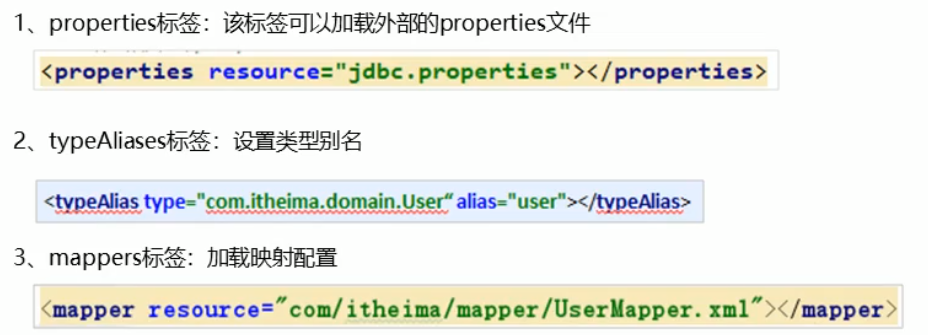
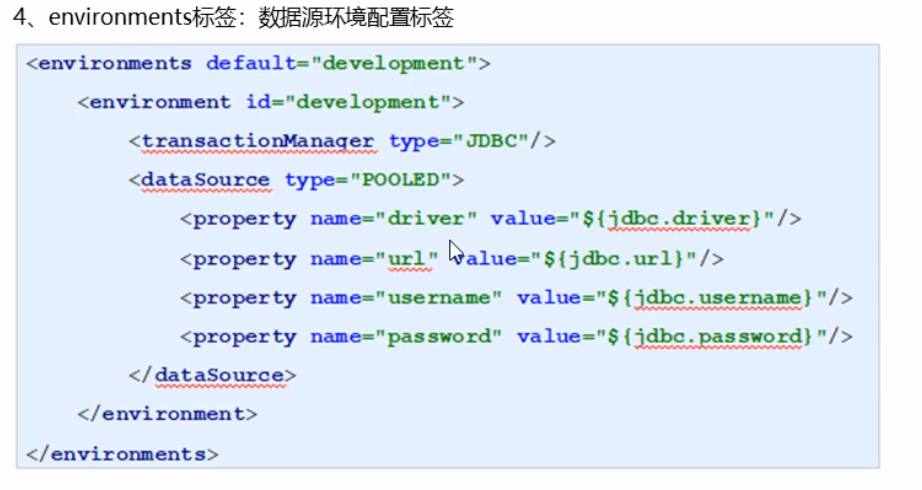
1、properties 标签:该标签可以加载外部的 properties 文件 2、typeAliases 标签:设置类型别名 3、environments 标签:数据源环境配置标签 4、typeHandlers 标签:配置自定义类型处理器 5、plugins 标签:配置 MyBatis 的插件
# 二十六、Mybatis的多表操作
# 一对一模型
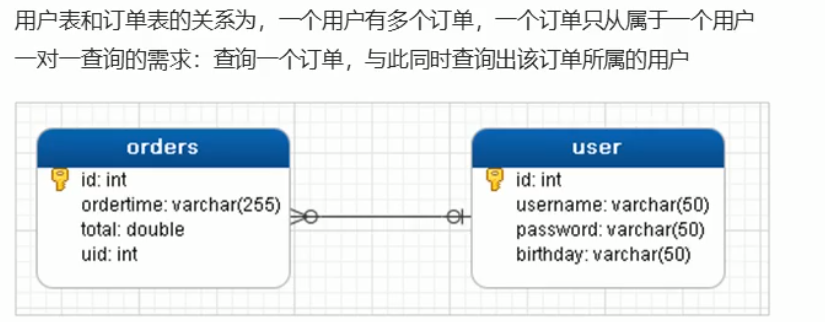
一对一查询的模型
环境搭建
①在数据库中创建相关的订单数据表
use test;
create table orders
(
id int auto_increment not null primary key,
ordertime date not null,
total double not null,
uid int not null
);
2
3
4
5
6
7
8
②在domain包下创建新的Order实体
public class Order {

    private int id;
    private Date orderTime;
    private double total;

    // 表示当前订单属于哪个用户
    // private int uid;
    private User user;

    public int getId() {
        return id;
    }

    public void setId(int id) {
        this.id = id;
    }

    public Date getOrderTime() {
        return orderTime;
    }

    public void setOrderTime(Date orderTime) {
        this.orderTime = orderTime;
    }

    public double getTotal() {
        return total;
    }

    public void setTotal(double total) {
        this.total = total;
    }

    public User getUser() {
        return user;
    }

    public void setUser(User user) {
        this.user = user;
    }

    @Override
    public String toString() {
        return "Order{" +
                "id=" + id +
                ", orderTime=" + orderTime +
                ", total=" + total +
                ", user=" + user +
                '}';
    }
}
2
3
4
5
6
7
8
9
10
11
12
13
14
15
16
17
18
19
20
21
22
23
24
25
26
27
28
29
30
31
32
33
34
35
36
37
38
39
40
41
42
43
44
45
46
47
48
49
50
51
52
③在mapper下创建OrderMapper的接口文件,顺便在映射文件Mapper目录下创建OrderMapper.xml的映射文件,里面暂时都为空,不添加数据,在SqlMapConfig.xml文件中定义Order实体的别名。
<!--定义别名,需要放到properties后面,放到靠前的位置,否则报错不匹配-->
<typeAliases>
    <typeAlias type="com.itheima.domain.User" alias="user"/>
    <typeAlias type="com.itheima.domain.Order" alias="order"/>
</typeAliases>
2
3
4
5
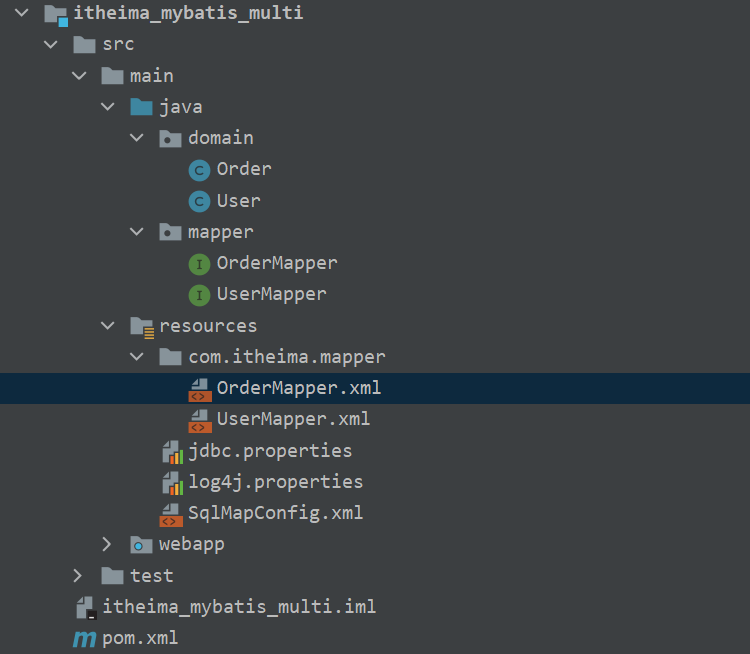
④在SqlMapConfig.xml文件中引入刚刚创建好的OrderMapper.xml文件
<!--加载映射文件-->
<mappers>
    <mapper resource="com.itheima.mapper/UserMapper.xml"/>
    <mapper resource="com.itheima.mapper/OrderMapper.xml"/>
</mappers>
2
3
4
5
# 配置实现
①在OrderMapper.xml映射配置文件中,添加如下的代码
<mapper namespace="com.itheima.mapper.OrderMapper">

    <resultMap id="orderMap" type="order">
        <!--手动指定对象和实体属性之间的映射关系-->
        <!--column : 数据表的字段名称-->
        <!--property : 实体的属性名称-->
        <id column="oid" property="id"/>
        <result column="ordertime" property="orderTime"/>
        <result column="total" property="total"/>
        <result column="uid" property="user.id"/>
        <result column="username" property="user.username"/>
        <result column="password" property="user.password"/>
        <result column="birthday" property="user.birthday"/>
    </resultMap>

    <!--查询操作-->
    <select id="findAll" resultMap="orderMap">
        select *, o.id oid, u.id uid from user u, orders o
        where o.uid=u.id;
    </select>

</mapper>
2
3
4
5
6
7
8
9
10
11
12
13
14
15
16
17
18
19
20
21
22
②在测试类中编写如下
@Test
public void test1() throws IOException {
    InputStream resourceAsStream = Resources.getResourceAsStream("sqlMapConfig.xml");
    SqlSessionFactory sqlSessionFactory = new SqlSessionFactoryBuilder().build(resourceAsStream);
    SqlSession sqlSession = sqlSessionFactory.openSession(true);

    OrderMapper orderMapper = sqlSession.getMapper(OrderMapper.class);
    List<Order> orderList = orderMapper.findAll();

    for (Order order : orderList) {
        System.out.println(order);
    }

    sqlSession.close();
}
2
3
4
5
6
7
8
9
10
11
12
13
14
15
测试的运行结果如下所示:
Loading class
com.mysql.jdbc.Driver'. This is deprecated. The new driver class iscom.mysql.cj.jdbc.Driver'. The driver is automatically registered via the SPI and manual loading of the driver class is generally unnecessary. 2021-04-14 17:35:46,513 DEBUG [org.apache.ibatis.datasource.pooled.PooledDataSource] - Created connection 402695541. 2021-04-14 17:35:46,517 DEBUG [com.itheima.mapper.OrderMapper.findAll] - ==> Preparing: select *, o.id oid, u.id uid from user u, orders o where o.uid=u.id; 2021-04-14 17:35:46,574 DEBUG [com.itheima.mapper.OrderMapper.findAll] - ==> Parameters: 2021-04-14 17:35:46,641 DEBUG [com.itheima.mapper.OrderMapper.findAll] - <== Total: 2 Order{id=1, orderTime=Mon Apr 01 00:00:00 CST 2019, total=3500.0, user=User{id=2, username='lisi', password='123', birthday=null}} Order{id=2, orderTime=Wed Apr 03 00:00:00 CST 2019, total=4200.0, user=User{id=1, username='zhangsan', password='123', birthday=null}} 2021-04-14 17:35:46,989 DEBUG [org.apache.ibatis.transaction.jdbc.JdbcTransaction] - Closing JDBC Connection [com.mysql.cj.jdbc.ConnectionImpl@1800a575] 2021-04-14 17:35:46,990 DEBUG [org.apache.ibatis.datasource.pooled.PooledDataSource] - Returned connection 402695541 to pool.Process finished with exit code 0
正常运行,也能够实现一对多的查询操作。Order和User的对应的结果也都存在。
其中,关于手动指定对象和实体属性之间的关系,还有另外一种的配置方法。
<resultMap id="orderMap" type="order">
    <!--手动指定对象和实体属性之间的映射关系-->
    <!--column : 数据表的字段名称-->
    <!--property : 实体的属性名称-->
    <id column="oid" property="id"/>
    <result column="ordertime" property="orderTime"/>
    <result column="total" property="total"/>
    <!--<result column="uid" property="user.id"/>
    <result column="username" property="user.username"/>
    <result column="password" property="user.password"/>
    <result column="birthday" property="user.birthday"/>-->
    <!--与……相匹配-->
    <!--
        property : 当前实体 Order 的属性名称 private User user
        javaType : 代表当前实体 Order 中的属性的类型
    -->
    <association property="user" javaType="user">
        <id column="uid" property="id"/>
        <result column="username" property="username"/>
        <result column="password" property="password"/>
        <result column="birthday" property="birthday"/>
    </association>
</resultMap>
2
3
4
5
6
7
8
9
10
11
12
13
14
15
16
17
18
19
20
21
22
23
# 一对多配置实现
①创建新的OrderMapper.xml文件,新的配置如下
<mapper namespace="com.itheima.mapper.OrderMapper">

    <resultMap id="orderMap" type="order">
        <!--手动指定对象和实体属性之间的映射关系-->
        <!--column : 数据表的字段名称-->
        <!--property : 实体的属性名称-->
        <id column="oid" property="id"/>
        <result column="ordertime" property="orderTime"/>
        <result column="total" property="total"/>
        <!--<result column="uid" property="user.id"/>
        <result column="username" property="user.username"/>
        <result column="password" property="user.password"/>
        <result column="birthday" property="user.birthday"/>-->
        <!--与……相匹配-->
        <!--
            property : 当前实体 Order 的属性名称 private User user
            javaType : 代表当前实体 Order 中的属性的类型
        -->
        <association property="user" javaType="user">
            <id column="uid" property="id"/>
            <result column="username" property="username"/>
            <result column="password" property="password"/>
            <result column="birthday" property="birthday"/>
        </association>
    </resultMap>

    <!--查询操作-->
    <select id="findAll" resultMap="orderMap">
        select *, o.id oid, u.id uid from user u, orders o where o.uid=u.id
    </select>

</mapper>
2
3
4
5
6
7
8
9
10
11
12
13
14
15
16
17
18
19
20
21
22
23
24
25
26
27
28
29
30
31
32
②在User中修改成如下
public class User {

    private int id;
    private String username;
    private String password;
    private Date birthday;

    // 描述的是当前用户存在哪些订单
    private List<Order> orderList;

    @Override
    public String toString() {
        return "User{" +
                "id=" + id +
                ", username='" + username + '\'' +
                ", password='" + password + '\'' +
                ", birthday=" + birthday +
                ", orderList=" + orderList +
                '}';
    }

    public List<Order> getOrderList() {
        return orderList;
    }

    public void setOrderList(List<Order> orderList) {
        this.orderList = orderList;
    }

    public int getId() {
        return id;
    }

    public void setId(int id) {
        this.id = id;
    }

    public String getUsername() {
        return username;
    }

    public void setUsername(String username) {
        this.username = username;
    }

    public String getPassword() {
        return password;
    }

    public void setPassword(String password) {
        this.password = password;
    }

    public Date getBirthday() {
        return birthday;
    }

    public void setBirthday(Date birthday) {
        this.birthday = birthday;
    }
}
2
3
4
5
6
7
8
9
10
11
12
13
14
15
16
17
18
19
20
21
22
23
24
25
26
27
28
29
30
31
32
33
34
35
36
37
38
39
40
41
42
43
44
45
46
47
48
49
50
51
52
53
54
55
56
57
58
59
60
61
③在UserMapper.xml文件中,配置如下
<mapper namespace="com.itheima.mapper.UserMapper">

    <resultMap id="userMap" type="user">
        <id column="uid" property="id"/>
        <result column="username" property="username"/>
        <result column="password" property="password"/>
        <result column="birthday" property="birthday"/>
        <!--配置集合信息-->
        <!--property : 集合名称-->
        <!--ofType : 集合当中的数据类型-->
        <collection property="orderList" ofType="order">
            <!--封装 order 的数据-->
            <id column="oid" property="id"/>
            <result column="orderTime" property="orderTime"/>
            <result column="total" property="total"/>
        </collection>
    </resultMap>

    <!--查询操作-->
    <select id="findAll" resultMap="userMap">
        select *, o.id oid from user u, orders o where o.uid=u.id
    </select>

</mapper>
2
3
4
5
6
7
8
9
10
11
12
13
14
15
16
17
18
19
20
21
22
23
24
④在测试类中添加新的测试方法
@Test
public void test2() throws IOException {
    InputStream resourceAsStream = Resources.getResourceAsStream("sqlMapConfig.xml");
    SqlSessionFactory sqlSessionFactory = new SqlSessionFactoryBuilder().build(resourceAsStream);
    SqlSession sqlSession = sqlSessionFactory.openSession(true);


    UserMapper mapper = sqlSession.getMapper(UserMapper.class);
    List<User> userList  = mapper.findAll();

    for (User user : userList) {
        System.out.println(user);
    }

    sqlSession.close();
}
2
3
4
5
6
7
8
9
10
11
12
13
14
15
16
运行结果如下所示:
Loading class
com.mysql.jdbc.Driver'. This is deprecated. The new driver class iscom.mysql.cj.jdbc.Driver'. The driver is automatically registered via the SPI and manual loading of the driver class is generally unnecessary. 2021-04-14 23:36:40,443 DEBUG [org.apache.ibatis.datasource.pooled.PooledDataSource] - Created connection 557023099. 2021-04-14 23:36:40,448 DEBUG [com.itheima.mapper.UserMapper.findAll] - ==> Preparing: select *, o.id oid from user u, orders o where o.uid=u.id 2021-04-14 23:36:40,506 DEBUG [com.itheima.mapper.UserMapper.findAll] - ==> Parameters: 2021-04-14 23:36:40,559 DEBUG [com.itheima.mapper.UserMapper.findAll] - <== Total: 2 User{id=2, username='lisi', password='123', birthday=null, orderList=[Order{id=1, orderTime=Mon Apr 01 00:00:00 CST 2019, total=3500.0, user=null}]} User{id=1, username='zhangsan', password='123', birthday=null, orderList=[Order{id=2, orderTime=Wed Apr 03 00:00:00 CST 2019, total=4200.0, user=null}]} 2021-04-14 23:36:40,583 DEBUG [org.apache.ibatis.transaction.jdbc.JdbcTransaction] - Closing JDBC Connection [com.mysql.cj.jdbc.ConnectionImpl@21337f7b] 2021-04-14 23:36:40,584 DEBUG [org.apache.ibatis.datasource.pooled.PooledDataSource] - Returned connection 557023099 to pool.Process finished with exit code 0
由上面的语句可以看出,已经能够实现一对多的查询操作
# 多对多模型
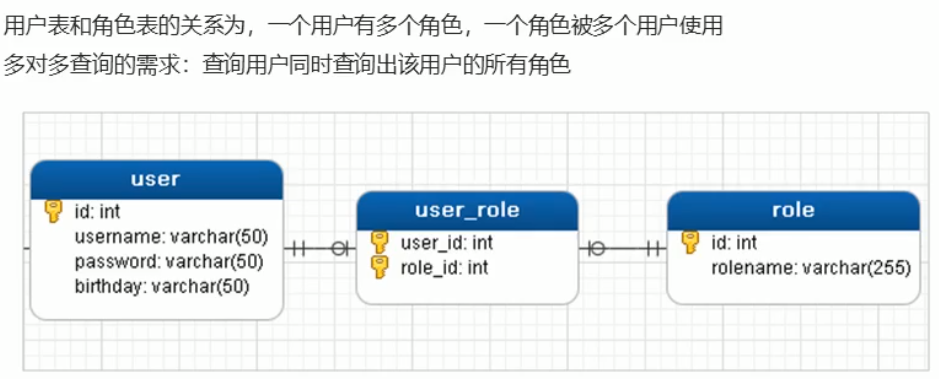
实际操作中,步骤如下
①首先在数据库中要创建新的多对多的关系模型
创建表格sys_user_role和sys_role表格,并往表格中插入相关的数据
use test;
create table sys_role
(
id int primary key,
roleName char(10),
roleDesc char(20)
);

insert into sys_role
values
(1, '院长', '负责全面工作'),
(2, '研究员', '课程研发工作'),
(3, '讲师', '授课工作');

select * from test.sys_role;

use test;
create table sys_user_role
(
userId int primary key,
roleId int
);

alter table sys_user_role drop primary key;

insert into sys_user_role values
(1, 1), (1, 2), (2, 2), (2, 3);

select * from sys_user_role;

select * from user u, sys_user_role ur, sys_role r where u.id=ur.userId and ur.roleId=r.id;
2
3
4
5
6
7
8
9
10
11
12
13
14
15
16
17
18
19
20
21
22
23
24
25
26
27
28
29
30
31
②创建好实体类Role,以对应之前创建的表格中的对象数据
public class Role {

    private int id;
    private String roleName;
    private String roleDesc;

    public int getId() {
        return id;
    }

    public void setId(int id) {
        this.id = id;
    }

    public String getRoleName() {
        return roleName;
    }

    public void setRoleName(String roleName) {
        this.roleName = roleName;
    }

    public String getRoleDesc() {
        return roleDesc;
    }

    public void setRoleDesc(String roleDesc) {
        this.roleDesc = roleDesc;
    }

    @Override
    public String toString() {
        return "Role{" +
                "id=" + id +
                ", roleName='" + roleName + '\'' +
                ", roleDesc='" + roleDesc + '\'' +
                '}';
    }
}
2
3
4
5
6
7
8
9
10
11
12
13
14
15
16
17
18
19
20
21
22
23
24
25
26
27
28
29
30
31
32
33
34
35
36
37
38
39
在User类中创建好对应的User—Role对应的数据集合
// 描述当前用户具备哪些角色
private List<Role> roleList;

@Override
public String toString() {
    return "User{" +
            "id=" + id +
            ", username='" + username + '\'' +
            ", password='" + password + '\'' +
            ", birthday=" + birthday +
            ", roleList=" + roleList +
            '}';
}
2
3
4
5
6
7
8
9
10
11
12
13
在UserMapper的接口中添加新的方法findUserAndRoleAll()
public interface UserMapper {

    List<User> findAll();

    List<User> findUserAndRoleAll();

}
2
3
4
5
6
7
③在UserMapper.xml文件和SqlMapConfig.xml文件中创建相关的配置
在核心配置文件中添加别名
<!--定义别名,需要放到properties后面,放到靠前的位置,否则报错不匹配-->
<typeAliases>
    <typeAlias type="com.itheima.domain.User" alias="user"/>
    <typeAlias type="com.itheima.domain.Order" alias="order"/>
    <typeAlias type="com.itheima.domain.Role" alias="role"/>
</typeAliases>
2
3
4
5
6
在映射配置文件中添加相关的sql语句以及结果映射
<!--查询UserAndRole-->
<resultMap id="userRoleMap" type="user">
    <!--user 信息-->
    <id column="userId" property="id"/>
    <result column="username" property="username"/>
    <result column="password" property="password"/>
    <result column="birthday" property="birthday"/>
    <!--user 内部的 userList 信息-->
    <collection property="roleList" ofType="role">
        <id column="roleId" property="id"/>
        <result column="roleName" property="roleName"/>
        <result column="roleDesc" property="roleDesc"/>
    </collection>
</resultMap>

<select id="findUserAndRoleAll" resultMap="userRoleMap">
    select * from user u, sys_user_role ur, sys_role r
    where u.id=ur.userId and ur.roleId=r.id
</select>
2
3
4
5
6
7
8
9
10
11
12
13
14
15
16
17
18
19
④在测试类中进行测试
上述的配置完成之后,我们就可以进入测试类中进行相关的测试了。
运行sql语句:select * from user u, sys_user_role ur, sys_role r where u.id=ur.userId and ur.roleId=r.id;
在MySQL中的查询结果如下
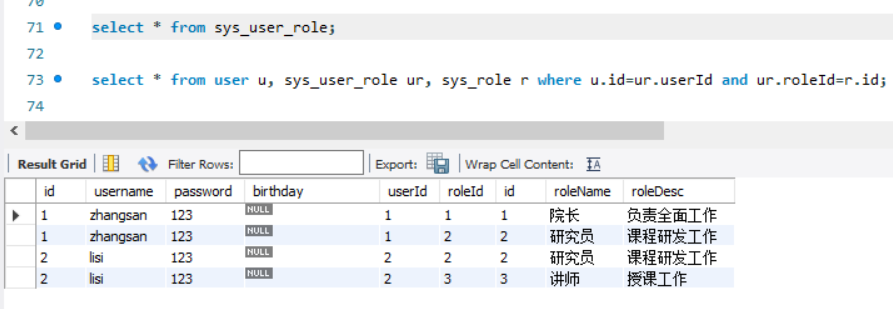
之后我们根据查询结果,对应出相关的column属性以及property属性,编写好配置文件之后,我们开始进行编写测试类的工作。
@Test
public void test3() throws IOException {
    InputStream resourceAsStream = Resources.getResourceAsStream("sqlMapConfig.xml");
    SqlSessionFactory sqlSessionFactory = new SqlSessionFactoryBuilder().build(resourceAsStream);
    SqlSession sqlSession = sqlSessionFactory.openSession(true);

    UserMapper mapper = sqlSession.getMapper(UserMapper.class);
    List<User> userAndRoleAll = mapper.findUserAndRoleAll();
    for (User user : userAndRoleAll) {
        System.out.println(user);
    }
    sqlSession.close();
}
2
3
4
5
6
7
8
9
10
11
12
13
运行结果如下所示
Loading class
com.mysql.jdbc.Driver'. This is deprecated. The new driver class iscom.mysql.cj.jdbc.Driver'. The driver is automatically registered via the SPI and manual loading of the driver class is generally unnecessary. 2021-04-15 15:19:52,883 DEBUG [org.apache.ibatis.datasource.pooled.PooledDataSource] - Created connection 273077527. 2021-04-15 15:19:52,889 DEBUG [com.itheima.mapper.UserMapper.findUserAndRoleAll] - ==> Preparing: select * from user u, sys_user_role ur, sys_role r where u.id=ur.userId and ur.roleId=r.id 2021-04-15 15:19:52,947 DEBUG [com.itheima.mapper.UserMapper.findUserAndRoleAll] - ==> Parameters: 2021-04-15 15:19:53,009 DEBUG [com.itheima.mapper.UserMapper.findUserAndRoleAll] - <== Total: 4 User{id=1, username='zhangsan', password='123', birthday=null, roleList=[Role{id=1, roleName='院长', roleDesc='负责全面工作'}, Role{id=2, roleName='研究员', roleDesc='课程研发工作'}]} User{id=2, username='lisi', password='123', birthday=null, roleList=[Role{id=2, roleName='研究员', roleDesc='课程研发工作'}, Role{id=3, roleName='讲师', roleDesc='授课工作'}]} 2021-04-15 15:19:53,035 DEBUG [org.apache.ibatis.transaction.jdbc.JdbcTransaction] - Closing JDBC Connection [com.mysql.cj.jdbc.ConnectionImpl@1046d517] 2021-04-15 15:19:53,035 DEBUG [org.apache.ibatis.datasource.pooled.PooledDataSource] - Returned connection 273077527 to pool.Process finished with exit code 0
可以看出,多对多的查询操作的结果已经能够正常显示出来。
# 知识小结
Mybatis的多表操作
一对一操作:使用<resultMap>做配置
一对多操作:使用<resultMap> + <collection>做配置
多对多操作:使用<resultMap> + <collection>做配置
# 二十七、Mybatis的注解开发
# 常用注解
近些时间注解开发越来越流行,能够减少我们编写Mapper映射文件的步骤,所以变得越来越重要。
常用的注解有以下这些:
| @Insert 实现新增 | @Update 实现更新 | @Delete 实现删除 | @Select 实现查询 |
|---|---|---|---|
| @Result 实现结果集封装 | @Results 可以和Result一起使用,封装多个结果集 | @One 实现一对一结果集封装 | @Many 实现一对多结果集封装 |
# XML完成基本的CRUD
这一步需要完成的步骤和前面的一样:创建新的项目,然后实现XML配置文件的方式实现CRUD的操作。配置文件和测试文件代码如下:
<mapper namespace="com.itheima.mapper.UserMapper">

    <!--插入操作-->
    <insert id="save" parameterType="user">
        insert into user values (#{id}, #{username}, #{password}, #{birthday})
    </insert>

    <!--修改操作-->
    <update id="update" parameterType="user">
        update user set username=#{username},password=#{password} where id=#{id}
    </update>

    <!--删除操作-->
    <delete id="delete" parameterType="int">
        delete from user where id=#{id}
    </delete>

    <!--查询操作-->
    <select id="findById" parameterType="int" resultType="user">
        select * from user where id = #{id}
    </select>

    <!--查询全部-->
    <select id="findAll" resultType="user">
        select * from user
    </select>

</mapper>
2
3
4
5
6
7
8
9
10
11
12
13
14
15
16
17
18
19
20
21
22
23
24
25
26
27
28
测试类
public class MybatisTest {

    private UserMapper userMapper;

    @Before
    public void before() throws IOException {
        InputStream resourceAsStream = Resources.getResourceAsStream("SqlMapConfig.xml");
        SqlSessionFactory sqlSessionFactory = new SqlSessionFactoryBuilder().build(resourceAsStream);
        SqlSession sqlSession = sqlSessionFactory.openSession(true);
        userMapper = sqlSession.getMapper(UserMapper.class);
    }

    @Test
    public void testSave() {
        User user = new User();
        user.setUsername("Tom");
        user.setPassword("abc");
        userMapper.save(user);
    }

    @Test
    public void testUpdate() {
        User user = new User();
        user.setId(7);
        user.setUsername("Lucy");
        user.setPassword("123");
        userMapper.update(user);
    }

    @Test
    public void testDelete() {
        userMapper.delete(7);
    }

    @Test
    public void testFindById() {
        User user = userMapper.findById(2);
        System.out.println(user);
    }

    @Test
    public void testFindAll() {
        List<User> userList = userMapper.findAll();
        for (User user : userList) {
            System.out.println(user);
        }
    }
}
2
3
4
5
6
7
8
9
10
11
12
13
14
15
16
17
18
19
20
21
22
23
24
25
26
27
28
29
30
31
32
33
34
35
36
37
38
39
40
41
42
43
44
45
46
47
48
最终都能成功正常运行并输出相关的数据结果。接下来我们要针对这些操作将这些XML配置文件的方式转换成注解开发的方式。
# 注解完成CRUD
①删除原先的UserMapper.xml配置文件
②因为不需要映射文件了,所以在核心配置文件中也需要删掉相关的加载映射文件的语句。
但是在此时还不能将所有的核心配置文件全部删除,因为在加载核心配置文件的时候还暂时涉及到数据库的连接参数等的获取。
我们在这里将加载映射文件的语句改为加载映射关系的语句:
<!--加载映射关系-->
<mappers>
    <!--指定接口所在的包-->
    <package name="com.itheima.mapper"/>
</mappers>
2
3
4
5
③在接口文件中添加注解,完成注解开发
public interface UserMapper {

    @Insert("insert into user values (#{id}, #{username}, #{password}, #{birthday})")
    void save(User user);

    @Update("update user set username=#{username},password=#{password} where id=#{id}")
    void update(User user);

    @Delete("delete from user where id=#{id}")
    void delete(int id);

    @Select("select * from user where id = #{id}")
    User findById(int id);

    @Select("select * from user")
    List<User> findAll();
}
2
3
4
5
6
7
8
9
10
11
12
13
14
15
16
17
在这个接口类中,每个接口上面添加相应的sql语句操作的注解。
④在测试类中测试运行
public class MybatisTest {

    private UserMapper userMapper;

    @Before
    public void before() throws IOException {
        InputStream resourceAsStream = Resources.getResourceAsStream("SqlMapConfig.xml");
        SqlSessionFactory sqlSessionFactory = new SqlSessionFactoryBuilder().build(resourceAsStream);
        SqlSession sqlSession = sqlSessionFactory.openSession(true);
        userMapper = sqlSession.getMapper(UserMapper.class);
    }

    @Test
    public void testSave() {
        User user = new User();
        user.setUsername("Tom");
        user.setPassword("abc");
        userMapper.save(user);
    }

    @Test
    public void testUpdate() {
        User user = new User();
        user.setId(8);
        user.setUsername("Lucy");
        user.setPassword("123");
        userMapper.update(user);
    }

    @Test
    public void testDelete() {
        userMapper.delete(8);
    }

    @Test
    public void testFindById() {
        User user = userMapper.findById(2);
        System.out.println(user);
    }

    @Test
    public void testFindAll() {
        List<User> userList = userMapper.findAll();
        for (User user : userList) {
            System.out.println(user);
        }
    }
}
2
3
4
5
6
7
8
9
10
11
12
13
14
15
16
17
18
19
20
21
22
23
24
25
26
27
28
29
30
31
32
33
34
35
36
37
38
39
40
41
42
43
44
45
46
47
48
此时运行结果正确,能够得到操作之后的结果。这一步骤的注解开发就是能够实现简单的查询操作,能够实现减少配置文件的使用,做到简化开发。
# 注解完成一对一开发
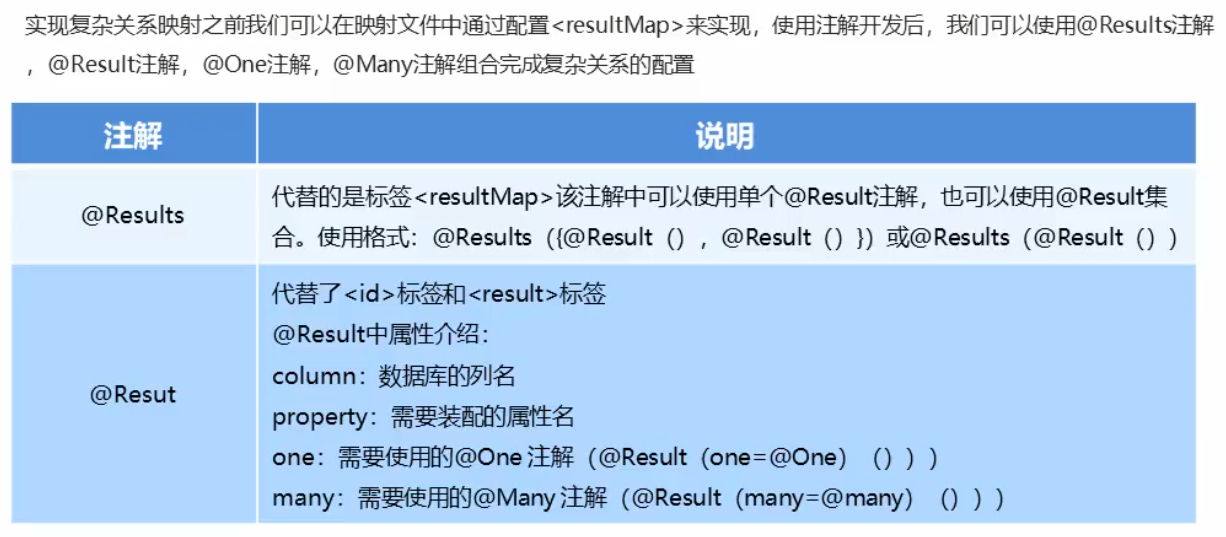

实际操作:一对一关系中,我们利用之前的数据模型来完成,用户和订单的关系模型
①创建Order实体类以及OrderMapper类
public interface OrderMapper {

    @Select("select *,o.id oid from orders o,user u where o.uid=u.id")
    @Results({
            @Result(column = "oid", property = "id"),
            @Result(column = "ordertime", property = "orderTime"),
            @Result(column = "total", property = "total"),
            @Result(column = "uid", property = "user.id"),
            @Result(column = "username", property = "user.username"),
            @Result(column = "password", property = "user.password")
    })
    public List<Order> findAll();

}
2
3
4
5
6
7
8
9
10
11
12
13
14
以上的就是用注解实现一对一复杂查询,利用Results和Result注解实现对查询结果集的封装工作
②创建新的测试类,运行测试
public class MybatisTest2 {

    private OrderMapper orderMapper;

    @Before
    public void before() throws IOException {
        InputStream resourceAsStream = Resources.getResourceAsStream("SqlMapConfig.xml");
        SqlSessionFactory sqlSessionFactory = new SqlSessionFactoryBuilder().build(resourceAsStream);
        SqlSession sqlSession = sqlSessionFactory.openSession(true);
        orderMapper = sqlSession.getMapper(OrderMapper.class);
    }

    @Test
    public void testSave() {
        List<Order> orderList = orderMapper.findAll();
        for (Order order : orderList) {
            System.out.println(order);
        }
    }
}
2
3
4
5
6
7
8
9
10
11
12
13
14
15
16
17
18
19
20
运行结果
2021-04-15 17:32:41,664 DEBUG [org.apache.ibatis.datasource.pooled.PooledDataSource] - Created connection 1597328335. 2021-04-15 17:32:41,668 DEBUG [com.itheima.mapper.OrderMapper.findAll] - ==> Preparing: select *,o.id oid from orders o,user u where o.uid=u.id 2021-04-15 17:32:41,721 DEBUG [com.itheima.mapper.OrderMapper.findAll] - ==> Parameters: 2021-04-15 17:32:41,759 DEBUG [com.itheima.mapper.OrderMapper.findAll] - <== Total: 2 Order{id=1, orderTime=Mon Apr 01 00:00:00 CST 2019, total=3500.0, user=User{id=2, username='lisi', password='123', birthday=null}} Order{id=2, orderTime=Wed Apr 03 00:00:00 CST 2019, total=4200.0, user=User{id=1, username='zhangsan', password='123', birthday=null}}
Process finished with exit code 0
可以看到sql语句,已经正常实现了查询,但是在实际中,我们需要使用到的远不止如此。
我们还可以用另外一种方式实现注解开发。
@Select("select * from orders")
@Results({
        @Result(column = "id", property = "id"),
        @Result(column = "ordertime", property = "orderTime"),
        @Result(column = "total", property = "total"),
        @Result(
                property = "user",  // 表示要封装的属性名称
                column = "uid",     // 根据哪个字段去查询user表的数据
                javaType = User.class,      // 要封装的属性实体类型
                // select 属性 代表查询哪个接口的方法获得数据
                one = @One(select = "com.otheima.mapper.UserMapper.findById")
        )
})
List<Order> findAll();
2
3
4
5
6
7
8
9
10
11
12
13
14
在OrderMapper文件中这样编写,之后运行测试中的类,可以看到运行没有出错。
# 注解完成一对多开发
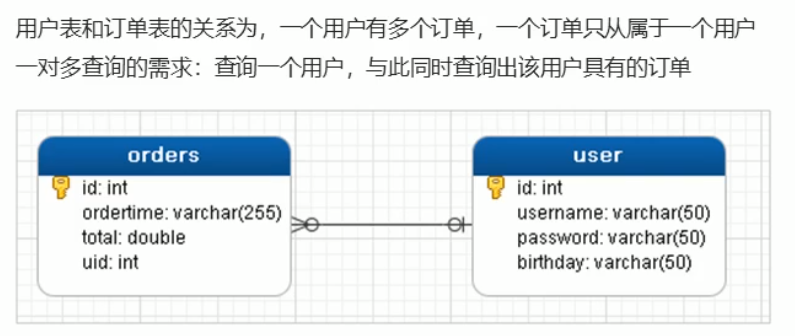
现在我们的需求是完后一对多的开发并利用注解实现。
实现逻辑:因为要实现一对多的查询,查询的是一个用户对应的多个订单。任务是将所有用户各自对应的所有订单信息都查询出来。所以我们首先应该实现逻辑查询语句。
use test;
select * from user;
select * from orders where uid=1;
2
3
①创建User类中的新的实体属性,以对应当前用户对应的订单信息,并添加对应的get和set方法
// 描述的是当前用户具有的订单
private List<Order> orderList;

@Override
public String toString() {
    return "User{" +
            "id=" + id +
            ", username='" + username + '\'' +
            ", password='" + password + '\'' +
            ", birthday=" + birthday +
            ", orderList=" + orderList +
            '}';
}
2
3
4
5
6
7
8
9
10
11
12
13
②在OrderMapper中添加新的方法,并用注解的方式实现查询语句的执行
@Select("select * from orders where uid=#{uid}")
List<Order> findByUid(int uid);
2
添加新的方法之后,因为我们要查询的是当前用户对应的各自的订单信息,所以我们根据查询到的用户的id来查询相应的订单信息。这个过程就是一对多的查询过程。
③在UserMapper中添加新的方法
@Select("select * from user")
@Results({
        // id = true 表示这个属性是一个主键
        @Result(id = true, column = "id", property = "id"),
        @Result(column = "username", property = "username"),
        @Result(column = "password", property = "password"),
        @Result(
                property = "orderList",
                column = "id",
                javaType = List.class,
                many = @Many(select = "com.itheima.mapper.OrderMapper.findByUid")
        )
})
List<User> findUserAndOrderAll();
2
3
4
5
6
7
8
9
10
11
12
13
14
根据需要,我们首先添加新的方法,然后调用这个方法获取到所有的用户,封装的查询结果中的OrderList中调用上述的findByUid方法,找到当前用户的订单信息集合。
④添加新的测试类
public class MybatisTest3 {

    private UserMapper mapper;

    @Before
    public void before() throws IOException {
        InputStream resourceAsStream = Resources.getResourceAsStream("SqlMapConfig.xml");
        SqlSessionFactory sqlSessionFactory = new SqlSessionFactoryBuilder().build(resourceAsStream);
        SqlSession sqlSession = sqlSessionFactory.openSession(true);
        mapper = sqlSession.getMapper(UserMapper.class);
    }

    @Test
    public void testSave() {
       List<User> userList = mapper.findUserAndOrderAll();
        for (User user : userList) {
            System.out.println(user);
        }
    }

}
2
3
4
5
6
7
8
9
10
11
12
13
14
15
16
17
18
19
20
21
最后,用上述的测试类打印出测试结果,如下所示:
User{id=1, username='zhangsan', password='123', birthday=null, orderList=[Order{id=2, orderTime=Wed Apr 03 00:00:00 CST 2019, total=4200.0, user=null}]} User{id=2, username='lisi', password='123', birthday=null, orderList=[Order{id=1, orderTime=Mon Apr 01 00:00:00 CST 2019, total=3500.0, user=null}]} User{id=3, username='wangwu', password='123', birthday=null, orderList=[]} User{id=4, username='zhaoliu', password='123', birthday=null, orderList=[]} User{id=8, username='Tom', password='abc', birthday=null, orderList=[]}
符合需求,打印出所需要的数据信息
# 注解完成多对多开发
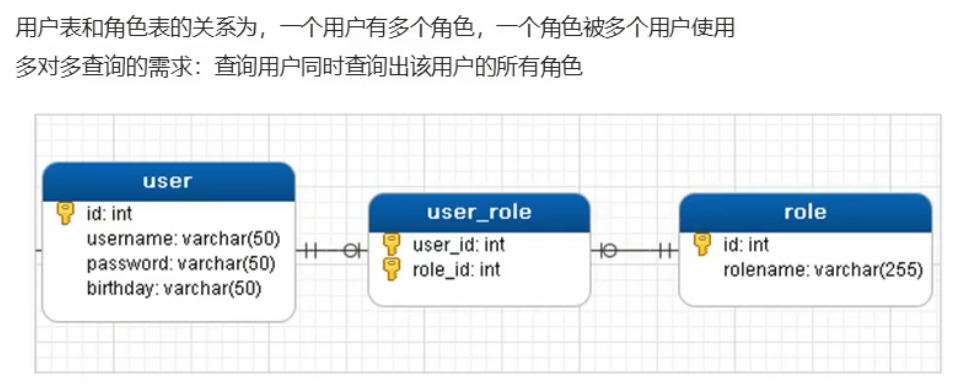
根据这一数据用户模型,我们需要在数据库中创建新的数据表对象。
use test;
create table role
(
id int primary key,
rolename varchar(255)
);
create table user_role
(
user_id int,
role_id int
);
alter table user_role add primary key (user_id, role_id);
2
3
4
5
6
7
8
9
10
11
12
下面进入Java开发阶段。
①在domain包下创建新的实体对象,Role
public class Role {

    private int id;
    private String roleName;
    private String roleDesc;

    public int getId() {
        return id;
    }

    public void setId(int id) {
        this.id = id;
    }

    public String getRoleName() {
        return roleName;
    }

    public void setRoleName(String roleName) {
        this.roleName = roleName;
    }

    public String getRoleDesc() {
        return roleDesc;
    }

    public void setRoleDesc(String roleDesc) {
        this.roleDesc = roleDesc;
    }

    @Override
    public String toString() {
        return "Role{" +
                "id=" + id +
                ", roleName='" + roleName + '\'' +
                ", roleDesc='" + roleDesc + '\'' +
                '}';
    }
}
2
3
4
5
6
7
8
9
10
11
12
13
14
15
16
17
18
19
20
21
22
23
24
25
26
27
28
29
30
31
32
33
34
35
36
37
38
39
②根据需求修改用户User的实体属性,添加下面的属性,并添加相应的getter和setter方法
// 表示当前用户具有的角色
private List<Role> roleList;

@Override
public String toString() {
    return "User{" +
            "id=" + id +
            ", username='" + username + '\'' +
            ", password='" + password + '\'' +
            ", birthday=" + birthday +
            ", roleList=" + roleList +
            '}';
}
2
3
4
5
6
7
8
9
10
11
12
13
根据我们的用户需求,我们需要查询的是多个用户对应的多个角色。一个用户拥有多个角色,一个角色也同时具备多个用户。
select * from user;
select * from sys_user_role ur, sys_role r where ur.roleId = r.id and ur.userId = --上一句sql语句的结果的id的值
2
③在UserMapper中添加新的方法
@Select("select * from user")
@Results({
        @Result(id = true, column = "id", property = "id"),
        @Result(column = "username", property = "username"),
        @Result(column = "password", property = "password"),
        @Result(
                property = "roleList",
                column = "id",
                javaType = List.class,
                many = @Many(select = "com.itheima.mapper.RoleMapper.findByUid")
        )
})
List<User> findUserAndRoleAll();
2
3
4
5
6
7
8
9
10
11
12
13
④添加新的接口映射文件RoleMapper
public interface RoleMapper {

    @Select("select * from sys_user_role ur, sys_role r where ur.roleId = r.id and ur.userId = #{uid}")
    List<Role> findByUid(int uid);
}
2
3
4
5
⑤创建新的测试类
public class MybatisTest4 {

    private UserMapper mapper;

    @Before
    public void before() throws IOException {
        InputStream resourceAsStream = Resources.getResourceAsStream("SqlMapConfig.xml");
        SqlSessionFactory sqlSessionFactory = new SqlSessionFactoryBuilder().build(resourceAsStream);
        SqlSession sqlSession = sqlSessionFactory.openSession(true);
        mapper = sqlSession.getMapper(UserMapper.class);
    }

    @Test
    public void test() {
        List<User> userAndRoleAll = mapper.findUserAndRoleAll();
        for (User user : userAndRoleAll) {
            System.out.println(user);
        }
    }

}
2
3
4
5
6
7
8
9
10
11
12
13
14
15
16
17
18
19
20
21
运行结果部分如下:
User{id=1, username='zhangsan', password='123', birthday=null, roleList=[Role{id=1, roleName='院长', roleDesc='负责全面工作'}, Role{id=2, roleName='研究员', roleDesc='课程研发工作'}]} User{id=2, username='lisi', password='123', birthday=null, roleList=[Role{id=2, roleName='研究员', roleDesc='课程研发工作'}, Role{id=3, roleName='讲师', roleDesc='授课工作'}]} User{id=3, username='wangwu', password='123', birthday=null, roleList=[]}
可以看到已经成功地实现了多对多的查询操作。
